| Voir le sujet précédent :: Voir le sujet suivant |
| Auteur |
Message |
ultralajt
Fidèle Posteur


Inscrit le: 01 Nov 2007

Âge: 64

|
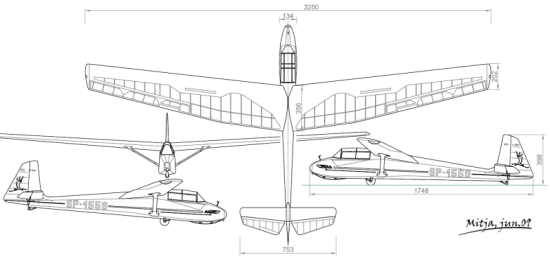
 Posté le: 13/06/2009 16:02 Sujet du message: SZD-10 Czapla, scale 1:5 Posté le: 13/06/2009 16:02 Sujet du message: SZD-10 Czapla, scale 1:5 |
  |
|
|
Hi!
I am starting a project of vintage sailplane SZD-10.
At this moment I am working on the fuselage drawings.
It is not finished yet, but the current stage is visible here:
http://www.youtube.com/watch?v=-1qBfp9dIJw
Some technical data and photos of the original, can be seen here:
http://www.piotrp.de/SZYBOWCE/dszd10.htm
Regards!
Mitja

Never try, never fail.... |
|
| Revenir en haut de page |
|
 |
VincentB
Serial Posteur


Inscrit le: 23 Jan 2006

Localisation: A la playa, bajo el sol
Âge: 60

|
| Posté le: 13/06/2009 16:19 Sujet du message: |
|
|
|
Hello Mitja,
nice and original project ![[good]](images/smiles/good.gif)
you draw with what software?
Retroplane et modélisme en pause, vanlife à haute dose. |
|
| Revenir en haut de page |
|
|
ultralajt
Fidèle Posteur
Inscrit le: 01 Nov 2007
Âge: 64
|
| Posté le: 13/06/2009 16:36 Sujet du message: |
|
|
|
The 3 D presentation on the video is made by Rhinoceros.
Plans are started by ruler and pencil on the paper, and later transfered into a CAD program.
I think, that at end of the week will start cut some fuselage parts and assemble them.
Mitja
Never try, never fail....
|
|
| Revenir en haut de page |
|
|
ultralajt
Fidèle Posteur
Inscrit le: 01 Nov 2007
Âge: 64
|
| Posté le: 14/06/2009 15:25 Sujet du message: |
|
|
|
Dimensions of the model:
Mitja
Never try, never fail....
|
|
| Revenir en haut de page |
|
|
ultralajt
Fidèle Posteur
Inscrit le: 01 Nov 2007
Âge: 64
|
| Posté le: 22/06/2009 07:45 Sujet du message: |
|
|
|
Hi again!
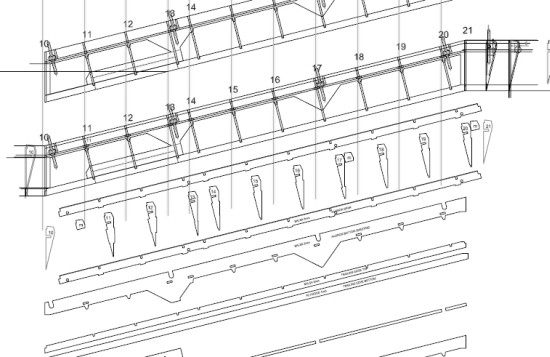
The making of drawings goes a bit slower together than I expect, but I am advancing anyway.
At this moment, the fuselage is allmost done, the wing planform and all ribs are drawn, allso the ailerons and rudder are finished.
But looking on the screen, the plans are a pretty mess at the moment as I don`t erase previous versions of some parts, (somethimes I return back to them) and I work the whole glider in one sheet... Once the parts are finished, I will separate each group and make proper workshop drawings.
Making of ailerons....preview....in progress
Now I am working on the vertical fin, and air brakes.... Brakes seems to be an easy job, but they are quite a challenge.
To make some fun while designing the model, I like to visualize and allso to check the parts compatibility, I put those in 3D and make a preview.
Here is a sample of how I played with a rudder:
Root ribs, spar and TE strip not shown in the orrect texture (it should be plywood..)
Some of the parts are bend in real life assembly, but here I was not able to show them proper bended... anyway I was able to find out some errors and later correct them properly :) this way.
And now a question for you:
Regarding the wing joiner, I am wondering if a steel joiners I selected, will be sufficient for a 3,25m wingspan oldtimer? There are two steel rods, main of 10mm diameter, and aft with 6mm diameter. Both of them are inserted in aluminum tube sleeves, that transfer loads uniformly to the plywood ribs and spars. I am going for steel rods, not carbon. I think, that carbon don`t bend under load permanently but breaks instantly, and steel rod bend under load and one can seee that it should ease on controlls, land and repair-change the structural element. Also the thin space between sleeves in the wing and fuselage, act like a stress riser when use a carbon rod joiner. Am I right or wrong here in my thoughts? What do you think about?
So much for now about the progress on that vintage model project.
Mitja
Never try, never fail....
|
|
| Revenir en haut de page |
|
|
VincentB
Serial Posteur
Inscrit le: 23 Jan 2006
Localisation: A la playa, bajo el sol
Âge: 60
|
| Posté le: 22/06/2009 08:08 Sujet du message: |
|
|
|
« ultralajt » a écrit: I am wondering if a steel joiners I selected, will be sufficient for a 3,25m wingspan oldtimer? There are two steel rods, main of 10mm diameter, and aft with 6mm diameter.
Hi Mitja
Yes, steel rod 10mm is good for this wingspan, you can also use fiberglass rod 12mm. Personally I never use carbon, I saw too many carbon's joiners break in flight after strong towing
PS: please for the next pictures, can you resize them at 550pixels and host them on the retroplane's server, not at free hoster, thank's 
Retroplane et modélisme en pause, vanlife à haute dose. |
|
| Revenir en haut de page |
|
|
ultralajt
Fidèle Posteur
Inscrit le: 01 Nov 2007
Âge: 64
|
| Posté le: 22/06/2009 08:29 Sujet du message: |
|
|
|
« VincentB » a écrit: « ultralajt » a écrit: I am wondering if a steel joiners I selected, will be sufficient for a 3,25m wingspan oldtimer? There are two steel rods, main of 10mm diameter, and aft with 6mm diameter.
Hi Mitja
Yes, steel rod 10mm is good for this wingspan, you can also use fiberglass rod 12mm. Personally I never use carbon, I saw too many carbon's joiners break in flight after strong towing
PS: please for the next pictures, can you resize them at 550pixels and host them on the retroplane's server, not at free hoster, thank's
Thanks for the hint about joiners Vincent!
I resize the pictures and drawings as you suggested and put them permanently on Retroplane. I will hold now with that settings in teh future.
In case iof some larger detailed photos, I will just add a link to the gallery.
Regards!
Mitja
Never try, never fail.... |
|
| Revenir en haut de page |
|
|
ultralajt
Fidèle Posteur
Inscrit le: 01 Nov 2007
Âge: 64
|
| Posté le: 01/07/2009 21:08 Sujet du message: |
|
|
|
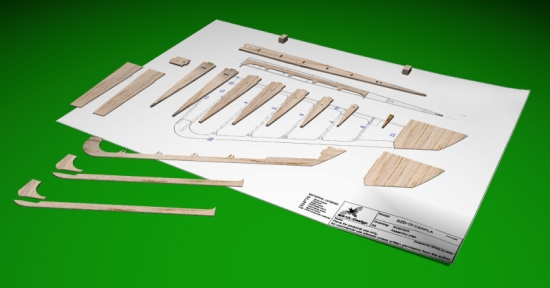
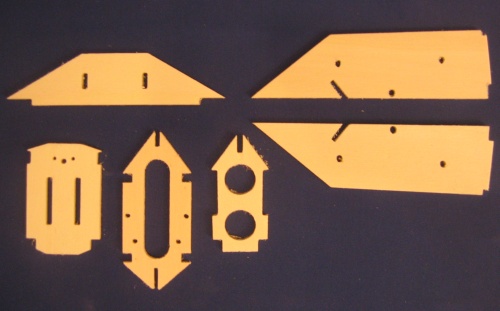
Well it is time to show the very first part of my model, that I build it this afternoon.
It is a rudder. I tested my design and it seems O.K., so I can go further with this method.
Today I cut some 3 mm plywood parts on my cnc router and rest of the parts from balsa, just carve with sharp hobby knife. I use templates printed on the paper, glued to the balsa and voila!
As design is with CNC manufacturing method in mind, I use a lot of interlacing details, so one can assemble parts allmost without drawings and assembly board in classical way.
Once you push ribs in slots on the spar, and attach plywood trailing edge, the structure stay firmly together and all parts are aligned properly.
I use white water based carpenter glue. The whole assembly went fast.
The trailing edge is a sandwich structure. The main part, middle part is 1 mm thick plywood. It has notches to accept the ribs. On both side of that TE goes 1,5mm thick balsa, sanded to triangular section once the rudder is ready to sand.
Some sheeting on bottom, at spar and at top are done by 1,2mm thick balsa.
And now come photos from today:
I glue ribs into the apropriate slots on the rudder spar. Then I glue trailing edge. To prevent any twisting, I clamp spar to a wooden board and let glue to dry:
Next I make all sheetings. I clamped it and let the glue dry. It was pretty fast. The basic structure was stiff enough not to worry about aligment when glueing that sheeting:
Finished rudder. I must just clean it with fine sandpaper when it will came to covering work. Some details.....
That is all for today!
I am looking forward to start elevator 
Mitja
Never try, never fail.... |
|
| Revenir en haut de page |
|
|
loopingfred
Incurable Posteur


Inscrit le: 24 Jan 2006

Localisation: Dublin - Ireland
Âge: 48

|
| Posté le: 01/07/2009 22:22 Sujet du message: |
|
|
|
![[clap]](images/smiles/Clap.gif) Looking really good Mitja ! Looking really good Mitja !
Watching with interrest, this machine is in my looonnngggg list of projects!
"Je ponce, donc j'essuie" - Rachel
MORE BEERS!!!! |
|
| Revenir en haut de page |
|
|
Laurent14
Incurable Posteur

Inscrit le: 22 Mai 2006

Localisation: Saint Philbert des Champs Calvados France
|
| Posté le: 01/07/2009 23:05 Sujet du message: |
|
|
|
Hi Mitja,
A very good work. Like the guppy

Le bonheur ne vaut d'être vécu que s'il est partagé.
Doucement le matin, pas trop vite le soir. |
|
| Revenir en haut de page |
|
|
ultralajt
Fidèle Posteur
Inscrit le: 01 Nov 2007
Âge: 64
|
| Posté le: 02/07/2009 07:18 Sujet du message: |
|
|
|
Thanks guys!
I will try to finish model before going to summer holidays in august.
Mitja
Never try, never fail.... |
|
| Revenir en haut de page |
|
|
Benoit1664
Accro Posteur


Inscrit le: 27 Sep 2007
Localisation: Caen
Âge: 64
|
| Posté le: 02/07/2009 07:27 Sujet du message: |
|
|
|
hello Mitja
a brilliant work........
vivement la retraite....(11 ans jus )
la différence entre Dieu et un pilote?
c'est que Dieu ne se prend pas pour un pilote
( dixit ma Môman...) |
|
| Revenir en haut de page |
|
|
ultralajt
Fidèle Posteur
Inscrit le: 01 Nov 2007
Âge: 64
|
| Posté le: 02/07/2009 10:41 Sujet du message: |
|
|
|
Thanks Bernoit!
It is not brilliant...somethimes photos dont show tiny faults .... 
The parts I build are not perfect as they can be, as I have no patience to invest much time to finish. Some minor imperfections will be hidden uder the covering, so I dont bother much.
Regards!
Mitja
Never try, never fail.... |
|
| Revenir en haut de page |
|
|
ultralajt
Fidèle Posteur
Inscrit le: 01 Nov 2007
Âge: 64
|
| Posté le: 04/07/2009 08:29 Sujet du message: |
|
|
|
Hi!
I encounter a big dilema ![[humm]](images/smiles/humm.gif)
Basically I designed the wing with steel rod wing joiners. One at main spar (10mm diameter, and one at diagonal spar at root (6 mm diameter).
Those joiners slides into the aluminum tubes that are mounted inside the wing and inside fuselage. The "fake" wing struts will prevent wing to slides out from joiners.
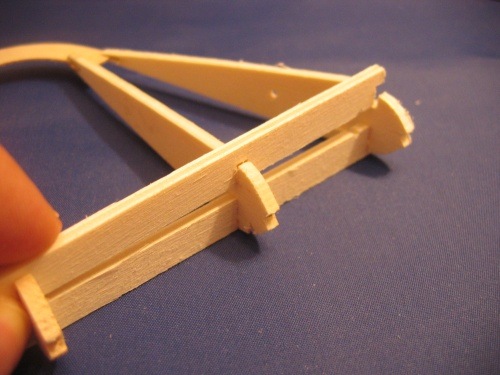
But, playing today with a quick release fork as I intend to use for wing struts ends for easy and quick mounting to the glider...I sudden realize, that I can put the stress on those wing struts and make wing attachment allmost the same as at real sailplane. So, both heavy steel rod wing joiners can be abadoned. I can save this way about 400 g of weight.

Quick release fork (gabelkopf spezial fur schnellversluch systeme)
But there is a question what weight of such sailplane (its wing loading actually) is apropriate?
If to light, it will floats and badly penetrate to headwind...if to heavy, it will fly fast and not look so scale in flight. ![[argh]](images/smiles/argh.gif)
On the other hand...what affect will have those 400 g on the wing area of 94 dm2.......4,25g on wing loading.........so it can be 54,25 or 50 g/dm ..with or without that steel joiners. (just guesing)
Any idea, hint, suggestion, direction, link.... 
Mitja
Never try, never fail.... |
|
| Revenir en haut de page |
|
|
ultralajt
Fidèle Posteur
Inscrit le: 01 Nov 2007
Âge: 64
|
| Posté le: 04/07/2009 21:23 Sujet du message: |
|
|
|
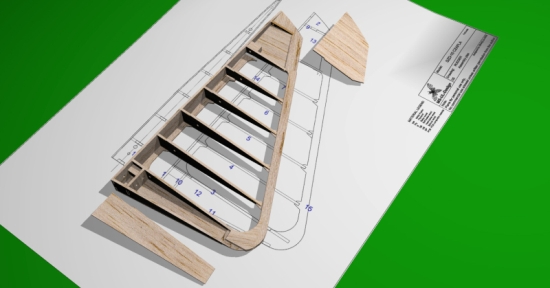
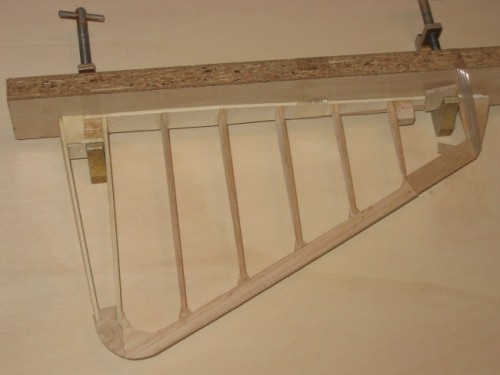
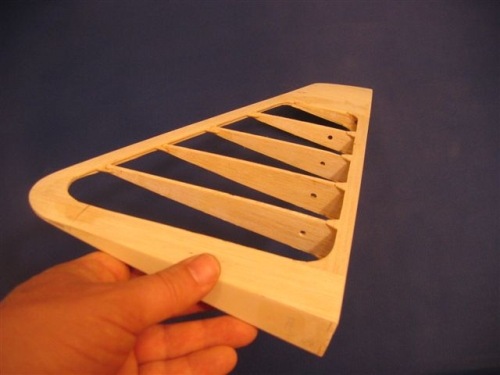
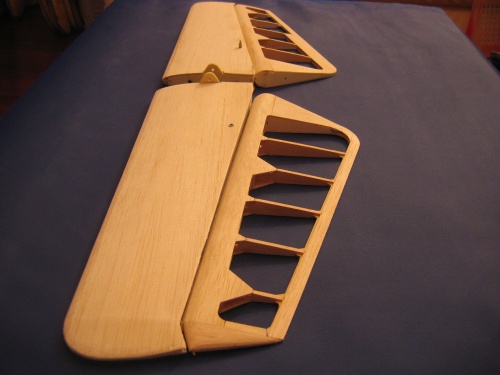
Today I start to build horizontal tail.
I cut all needed parts and glue basic structure of left stabilizator.
I also test how fit parts of elevator. It seems that will go together easily as I expected.
The stabilizator will be covered with 1,5 mm balsa sheeting, while elevator has only some sheeting at spar, between two root ribs and some sandwiching of the trailing edge. Left eleveator had trim tab (real plane) but on the model only red colored rectang will imitate trim tab.
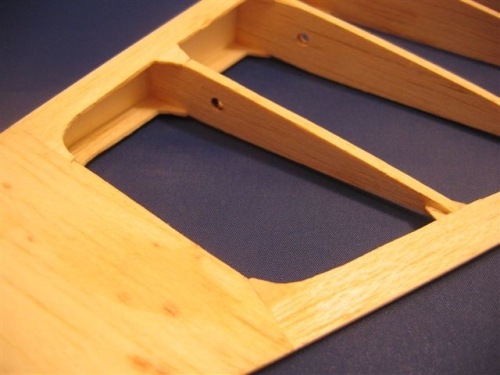
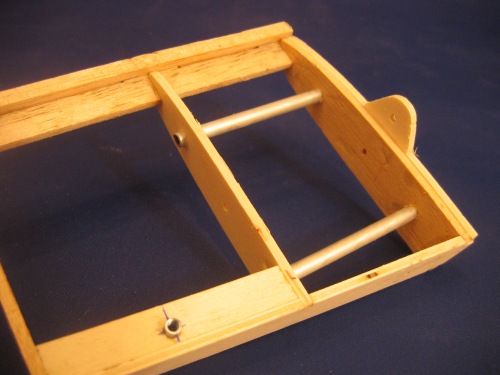
Stabilizator need to accept also two aluminum bushings as it will be removable. Also some hardpoints for struts and hinges must be glued into proper places.
And now some photos taken today:
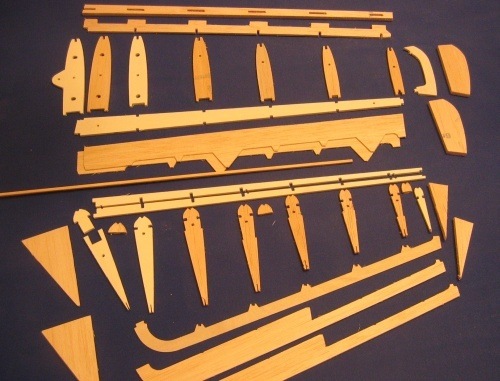
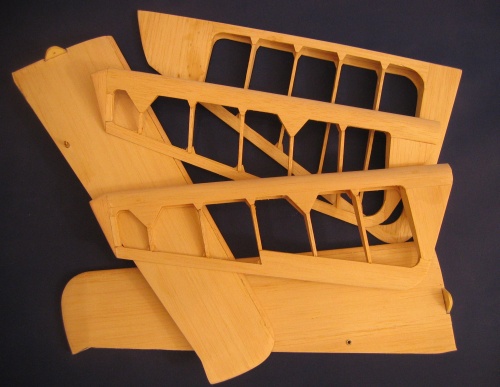
Most of hor.tail parts (one half)
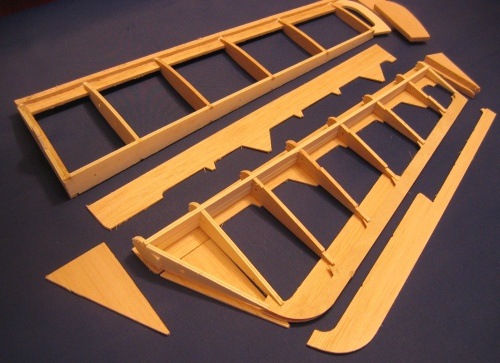
Roughly assembled to see how fits together...
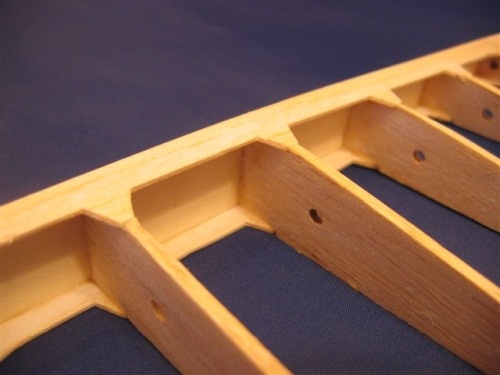
Ribs of elevator are clamped between spar made from two pieces.
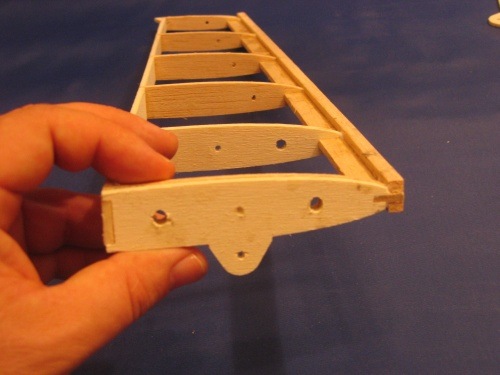
As horizontal tail will be removable, two aluminum tubes will be glued into first two ply wood ribs. Note an eye where a bolt will be for holding the tail against the fuselage.
So much for today.
Mitja
Never try, never fail.... |
|
| Revenir en haut de page |
|
|
ultralajt
Fidèle Posteur
Inscrit le: 01 Nov 2007
Âge: 64
|
| Posté le: 05/07/2009 23:02 Sujet du message: |
|
|
|
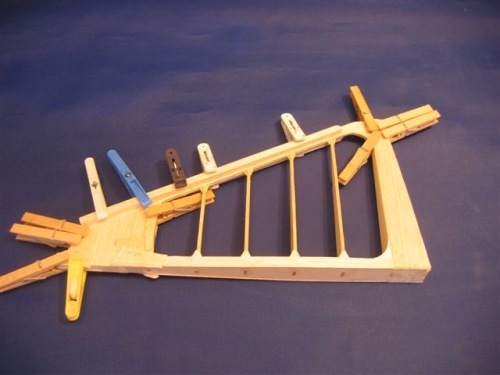
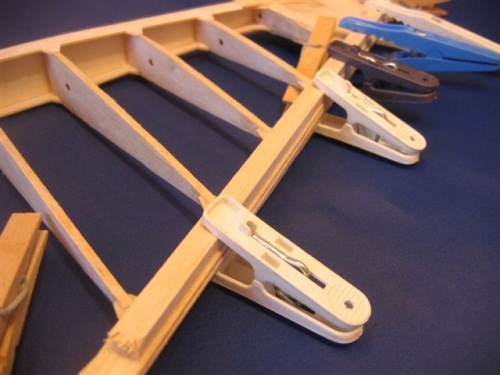
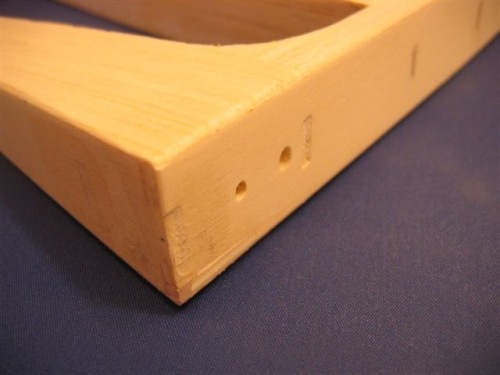
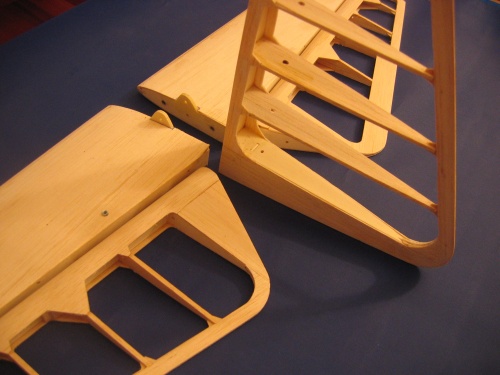
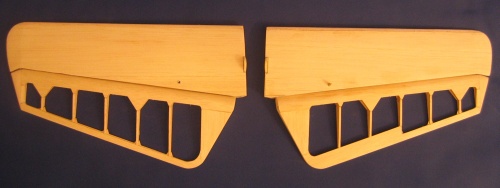
Today I was invited to a picnic, so I didnt have time for building. But at the morning I sheeted one stabilizator and assemble the oposite one basic frame. I will add shetting tomorrow.
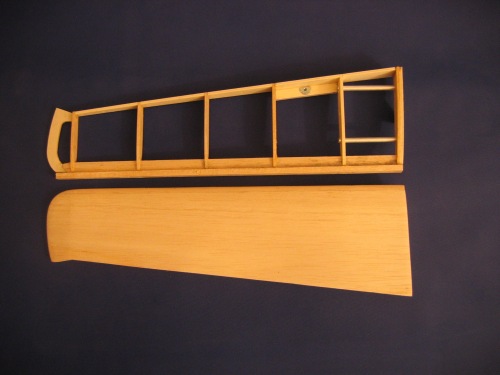
Both horizontal stab. halves.
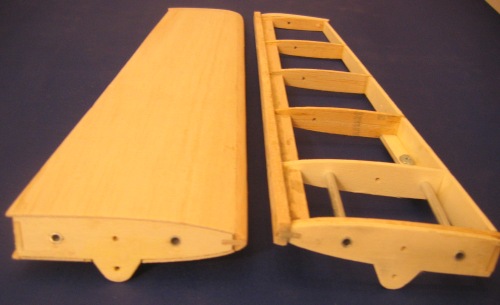
View from the root. Note attachment eye...not necessarry in case of the "fake" struts are installed.
Press nut for fake strut attachment.
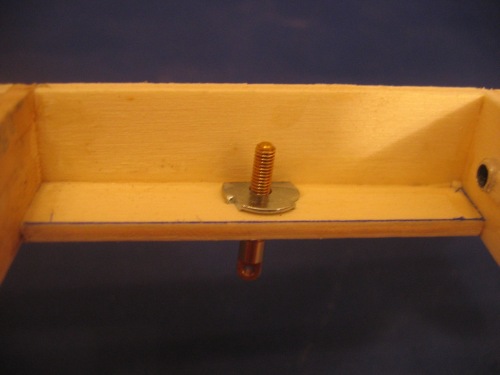
Another view on the press nut installation.
so much for now...
Mitja
Never try, never fail.... |
|
| Revenir en haut de page |
|
|
ultralajt
Fidèle Posteur
Inscrit le: 01 Nov 2007
Âge: 64
|
| Posté le: 06/07/2009 06:43 Sujet du message: |
|
|
|
For this model is too late now, but in the plans I will probably made correction at horizontal tail strut attachment. I will provide angled position of the blind nut for an eyebolt strut attachment, so it will look more scale and it will be stressed "in line".
Well, the upright orientation as I make it on this protoype is firm enough but it stings in the eyes with that odd orientation. 
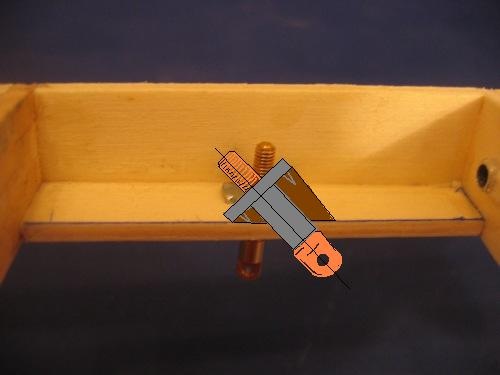
Correction. Triangle block and slanted nut. (sketch not in scale! )
Never try, never fail.... |
|
| Revenir en haut de page |
|
|
ultralajt
Fidèle Posteur
Inscrit le: 01 Nov 2007
Âge: 64
|
| Posté le: 06/07/2009 22:34 Sujet du message: |
|
|
|
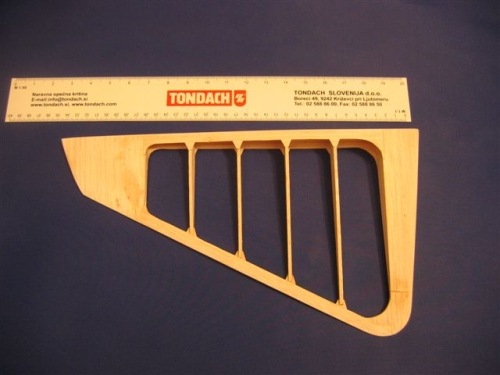
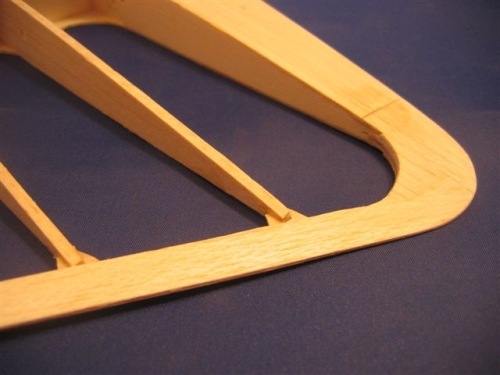
Today I almost finished with work on the horizontal tail. It just needs to open the slots in elevators leading edge sheeting at hinge locations, and sand clean all surfaces. After that, hinging must be installed and then a covering.... But will left covering aside of course till all parts are finished.
Mitja
Never try, never fail.... |
|
| Revenir en haut de page |
|
|
Nicolas M
Fidèle Posteur

Inscrit le: 24 Avr 2007
Localisation: Huttenheim (67)
Âge: 41

|
| Posté le: 06/07/2009 23:10 Sujet du message: |
|
|
|
That's really a very nice work, congratulations!
I hope my SZD-8 will as well build as your work!
Nicolas |
|
| Revenir en haut de page |
|
|
ultralajt
Fidèle Posteur
Inscrit le: 01 Nov 2007
Âge: 64
|
|
| Revenir en haut de page |
|
|
Nicolas M
Fidèle Posteur
Inscrit le: 24 Avr 2007
Localisation: Huttenheim (67)
Âge: 41
|
| Posté le: 07/07/2009 08:13 Sujet du message: |
|
|
|
Whaouh!
thanks for this really interesting and complete web page, specially the details for the scale panel.
Nicolas |
|
| Revenir en haut de page |
|
|
ultralajt
Fidèle Posteur
Inscrit le: 01 Nov 2007
Âge: 64
|
| Posté le: 08/07/2009 06:46 Sujet du message: |
|
|
|
Yesterday (or better said last night) I start to cut fuselage parts. I manage to cut all length-vise parts and some of the formers. Majority of the fuselage formers still waiting to be cut.
Once all parts will be prepared, I think, that assembly will go fast ahead.
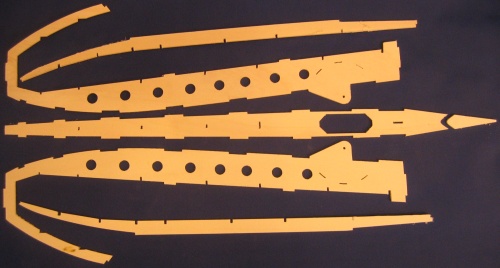
Of course, I could not resist not to "assemble" some parts, curiously if they fit!? 
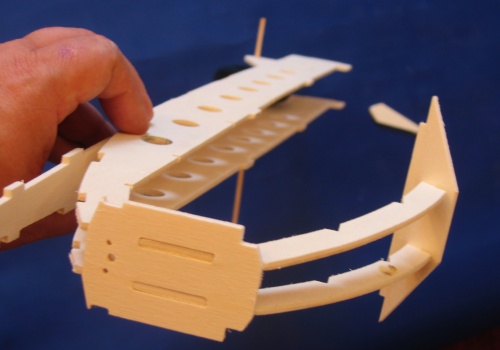
Yeah, baby!!!
Shape is slowly showing itself.....
Mitja
Never try, never fail.... |
|
| Revenir en haut de page |
|
|
GuillaumeG
Accro Posteur

Inscrit le: 04 Mar 2006

Localisation: Munich / Savoie (73)
Âge: 39

|
| Posté le: 08/07/2009 19:40 Sujet du message: |
|
|
|
Very nice work Mitja!!! It looks like a puzzle where everything fits perfectly!
Continue posting |
|
| Revenir en haut de page |
|
|
ultralajt
Fidèle Posteur
Inscrit le: 01 Nov 2007
Âge: 64
|
| Posté le: 08/07/2009 22:20 Sujet du message: |
|
|
|
Thanks GuillaumeG!
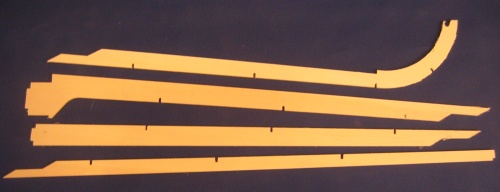
Today in the afternoon I manage to cut all 3 mm plywood parts of the fuselage. I left 4 mm plywood formers and some details of fuselage/wing attachments for tomorrow.
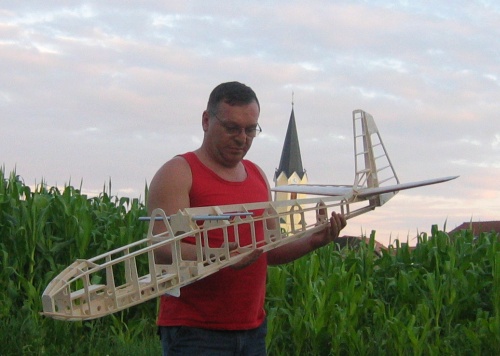
I clamped temporary the fuselage to get the feeling of its size. I like it!
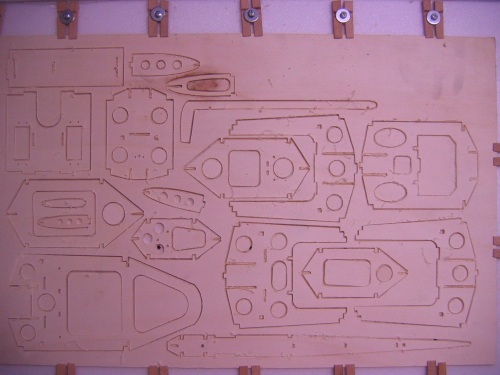
3mm white poplar plywood.
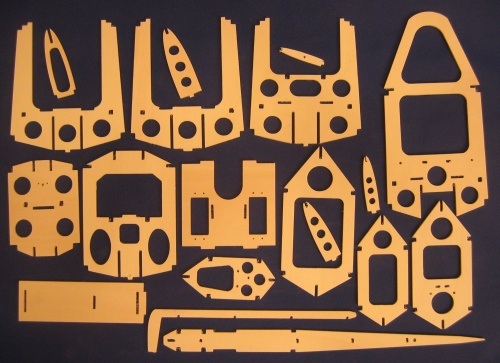
Prepared for installation....
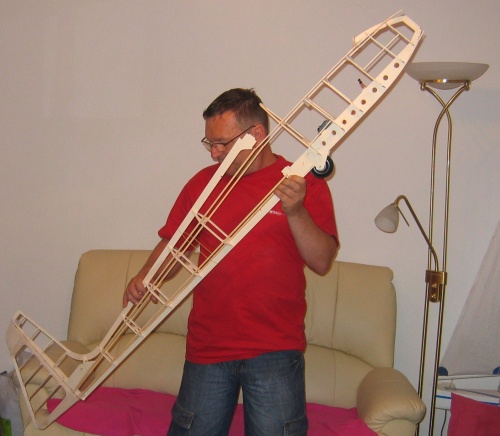
So, this is the length?! ~175 cm!
Thats all folks, for today!
Mitja
Never try, never fail.... |
|
| Revenir en haut de page |
|
|
ultralajt
Fidèle Posteur
Inscrit le: 01 Nov 2007
Âge: 64
|
| Posté le: 10/07/2009 10:59 Sujet du message: |
|
|
|
Yesterday I cut both main fuselage formers. At the main wing and at reat wing spar. I test fir (no glue) on their proper places and I am satisfied. Parts needs some cleaning at edges (1,5mm mill bit leave radius on inside corners) with fine file. Almost at all places this is not necessarry as under apressure corners somehow dont present any problem, but when some harder mateials are the case, some filing of cormners is necessarry.
An interesting thing!
Yesterday I made 2 mm thick aluminum bracket for wing strut mounting to the fuselage. Usually I plot a part on tghe paper and glue paper on the material. Then I mark hole centers with punch and dlill them out. Then I clamp part in vice and roughly handsaw part out. Then I use a file and file as close I can to the lines on the paper drawing glued to the material.
But handling that out and in to a vice sooner or later (often too soon) damage the paper darwing that guide me as I shape the part.
So, yesterday I use two sided adhesive tape, and glue aluminum to a heavy wood board. Put that on my CNC machine. Then I use V shaped engraving mill bit and engrave brackets shape onto aluminum. I go 0,15mm deep. The result was better than I expected! Now I use hand tools to complete those brackets (handsaw, drill and file)
You would probably aske, why I just didnt cut (finish) that aluminum on CNC?!
Well, I doubt that my machine could handle metals as tool backforce is much larger than on the wood. This will stres the machine frame, lead to elastic deformatinos, and mill bit will drift away from the theoretical line, spoiling the par shape.
Mitja
Never try, never fail.... |
|
| Revenir en haut de page |
|
|
espenlaub
Fidèle Posteur

Inscrit le: 01 Juil 2008
|
| Posté le: 10/07/2009 14:18 Sujet du message: |
|
|
|
Very, very, very, very nice work
Gruß
Espenlaub |
|
| Revenir en haut de page |
|
|
ultralajt
Fidèle Posteur
Inscrit le: 01 Nov 2007
Âge: 64
|
| Posté le: 11/07/2009 18:49 Sujet du message: |
|
|
|
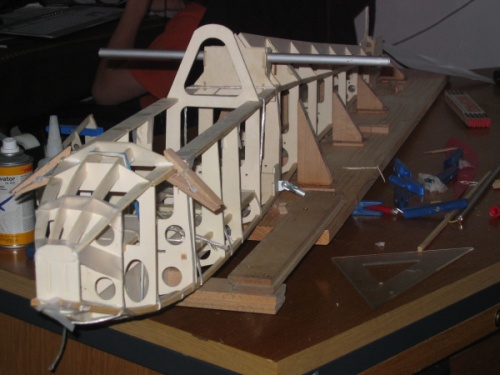
Thanks espenlaub!
Today I manage to finish basic framework of the fuselage, so tomorrow (hopefuly) a sheeting with 3 mm balsa wil begin.
Now the glue dry, while whole structure is fixed on the board and clamped between wood tiangles, that hold it upright.
Never try, never fail.... |
|
| Revenir en haut de page |
|
|
ultralajt
Fidèle Posteur
Inscrit le: 01 Nov 2007
Âge: 64
|
| Posté le: 11/07/2009 21:07 Sujet du message: |
|
|
|
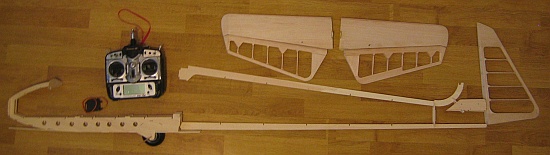
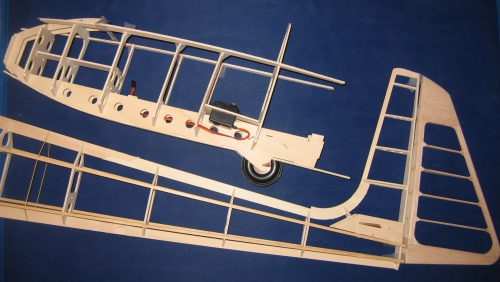
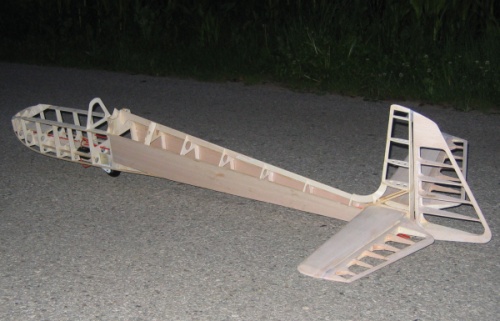
Just after a sunset, I manage to release the fuselage from a board, install horizontal tail, and went out to take some photos.
And here they are!
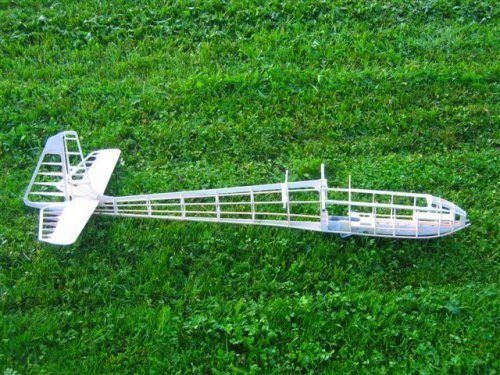
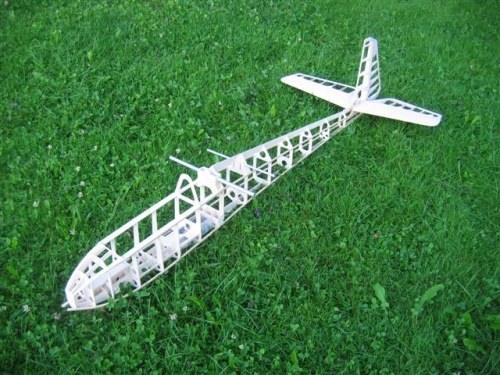
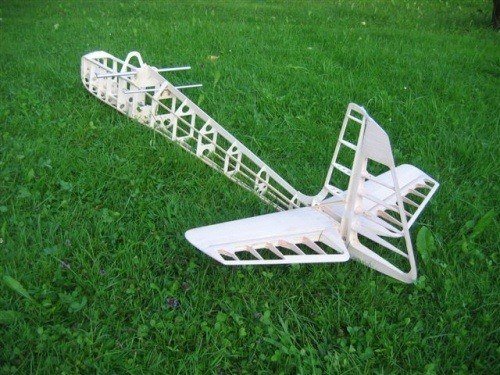

Good night!
Mitja
Never try, never fail.... |
|
| Revenir en haut de page |
|
|
jify
Fidèle Posteur

Inscrit le: 25 Jan 2006

Localisation: Bois-Seigneur-isaac ( Belgique )
Âge: 72
|
| Posté le: 11/07/2009 21:20 Sujet du message: |
|
|
|
Hi ,
really good work .
![[amen]](images/smiles/amen.gif)
thanks for all your fotos , and your work report .
i would like to have the building of my brunner-winkle as fast as you build ...
bye
A+
Jean-Francois Delhove |
|
| Revenir en haut de page |
|
|
ultralajt
Fidèle Posteur
Inscrit le: 01 Nov 2007
Âge: 64
|
| Posté le: 12/07/2009 20:53 Sujet du message: |
|
|
|
Jean, I am building fast as I want to accomplish maiden flight before the 10th of august.
Today I was not so dedicated to the model, but I managed anyway to put some sheeting on the fuselage.
Regards!
Mitja
Never try, never fail.... |
|
| Revenir en haut de page |
|
|
|