| Voir le sujet précédent :: Voir le sujet suivant |
| Auteur |
Message |
sebastian92
Serial Posteur


Inscrit le: 01 Sep 2015

Localisation: Hauts de seine
Âge: 60

|
 Posté le: 02/11/2019 00:48 Sujet du message: Posté le: 02/11/2019 00:48 Sujet du message: |
  |
|
|
Hello,
MARVELOUS ![[clap]](images/smiles/Clap.gif)
Superbe dentelle de bois !
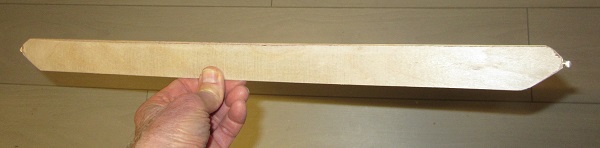
Il doit être très léger ! tu l'a pesé en l'état ?

Pourvu que ça vole, roule, flotte ! normalement j'ai tout bien fait pour
Un bel avion est un avion qui vole bien ! Marcel Dassault
Sebastian
Vends module émission 2.4 ghz pour Futaba, Hitec TZ-FM + 2 récepteurs corona 8 voies (contact en MP) |
|
| Revenir en haut de page |
|
 |
bocorvin
Maniaco Posteur


Inscrit le: 17 Aoû 2015

Localisation: Hillegom
Âge: 77

|
| Posté le: 02/11/2019 10:03 Sujet du message: |
|
|
|
Hello Sebastian,
Merci pour les comments 
In this state it weighs 2150 gram, I hope it will stay under 4000 gram when ready, (I hope...)
Vincent |
|
| Revenir en haut de page |
|
|
bocorvin
Maniaco Posteur
Inscrit le: 17 Aoû 2015
Localisation: Hillegom
Âge: 77
|
| Posté le: 07/11/2019 16:46 Sujet du message: |
|
|
|
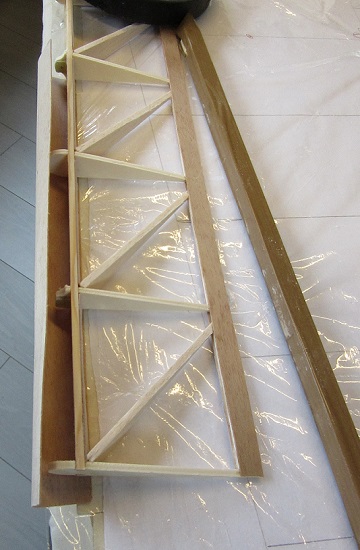
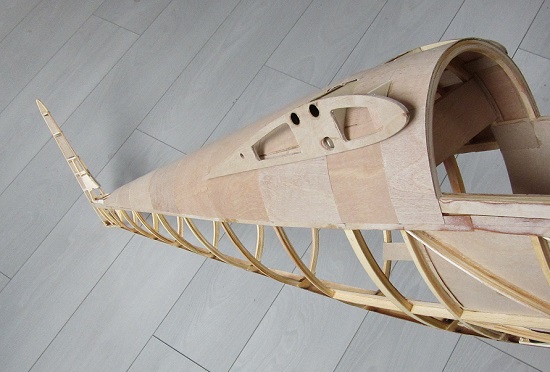
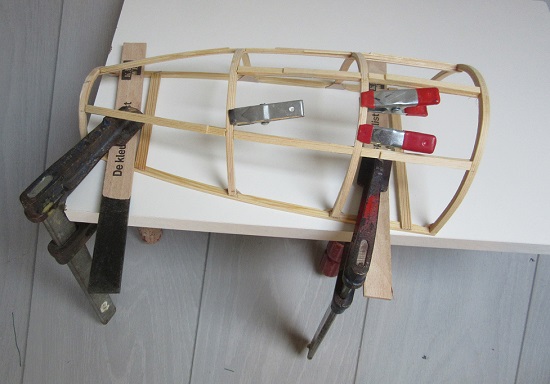
Bonjour a tous,
Now I had to seperate the ailerons from the wings, the hinges were already glued in place
a small saw cut just opposite the hinge

(not the same rib)
A lot of sanding...
and to my great relief it fitted OK.
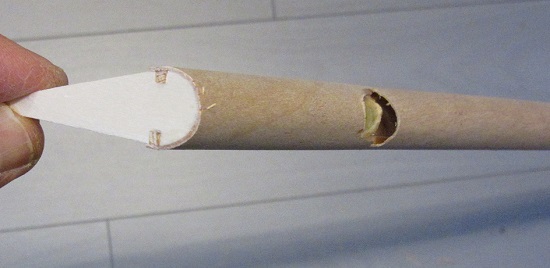
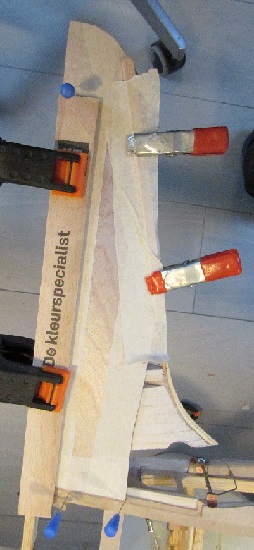
I wanted to build the round nose of the aileron from 0.8mm ply, so it should form a small ply "D "box to add torsion stiffness to the aileron.
Bending the ply with boiling water
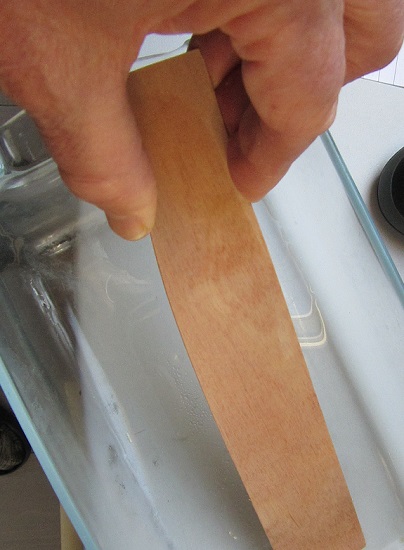
drying
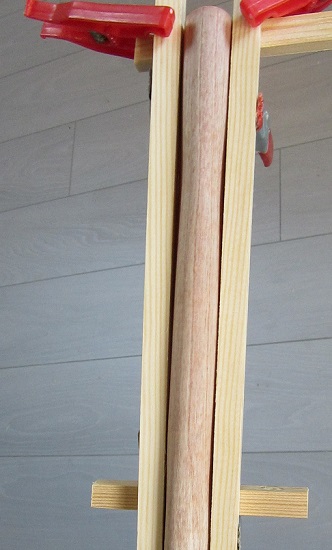
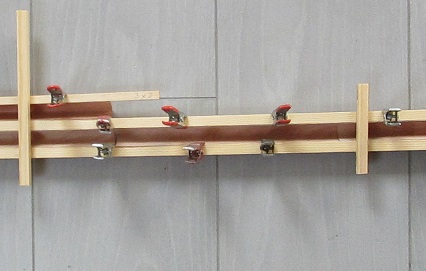
After some trials I made quite small panels (couldn't handle bigger ones  ) glued it with thick cyano at one side ) glued it with thick cyano at one side
and after hardening, to the other side
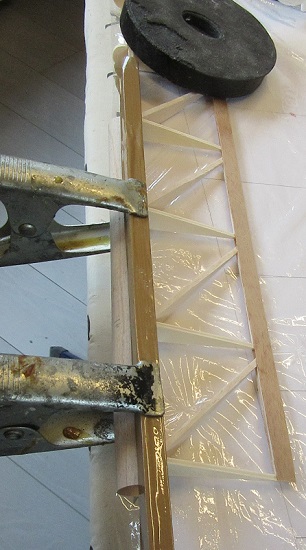
clamping it firmly, its not a big radius....
Made the apertures for the hinges with a Dremel (in fact a proxxon) and joined it with a wing
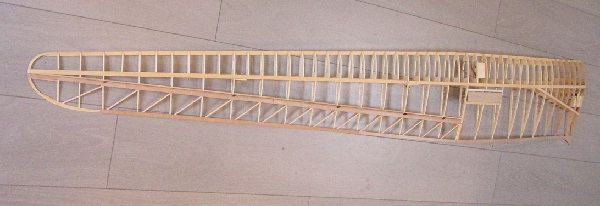
it is very stiff in torsion
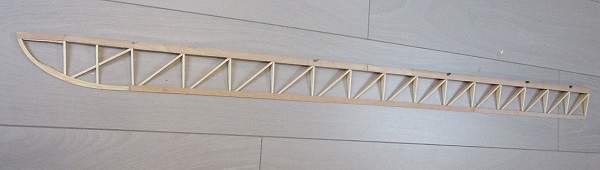

The trailing edge of the wing itself from a strip of ply itself still must be added, should give a small gap.
The pulleys are already waiting for the pull-pull cables....
Vincent |
|
| Revenir en haut de page |
|
|
sebastian92
Serial Posteur
Inscrit le: 01 Sep 2015
Localisation: Hauts de seine
Âge: 60
|
| Posté le: 07/11/2019 17:35 Sujet du message: |
|
|
|
Hello Vincent,
let's talk in english (i hope)
we are on the same job 
dont you bend before the plywood on a metal tube ? it's more easy and keep the form to glue after without forcing !
another thing ; you should put a tube in front of the hinge pin for better rotation; that's what I do for a few grm of +
good continuation !
Pourvu que ça vole, roule, flotte ! normalement j'ai tout bien fait pour
Un bel avion est un avion qui vole bien ! Marcel Dassault
Sebastian
Vends module émission 2.4 ghz pour Futaba, Hitec TZ-FM + 2 récepteurs corona 8 voies (contact en MP) |
|
| Revenir en haut de page |
|
|
bocorvin
Maniaco Posteur
Inscrit le: 17 Aoû 2015
Localisation: Hillegom
Âge: 77
|
| Posté le: 07/11/2019 18:00 Sujet du message: |
|
|
|
Hello Sebastian,
Thanks for your pleasant comments .
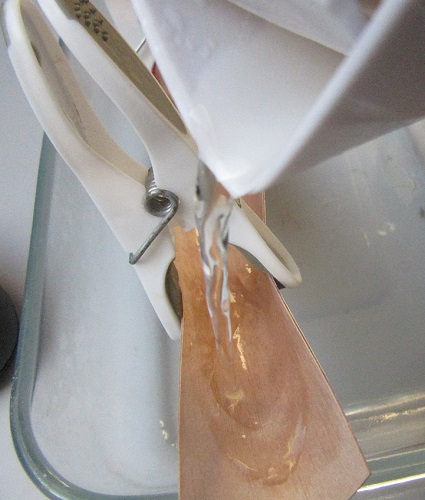
Well, I started with bending around a tube, but pouring boiling water over the ply, while at the same time the clamps (washing pegs ) bend the ply, suited me better. So the strips are pretty well prebend. I had problems to get the ply flush glued to the 3 X 3 stringers, that why I needed the big clamps .
Maybe it was easier to take a much wider strip and cut the surplus of after gluing. (But its already finished)
It feels very rigid and I just wrote down how I fixed it, certainly there are many (good) other ways to get a proper result
Vincent |
|
| Revenir en haut de page |
|
|
bocorvin
Maniaco Posteur
Inscrit le: 17 Aoû 2015
Localisation: Hillegom
Âge: 77
|
| Posté le: 10/11/2019 21:08 Sujet du message: |
|
|
|
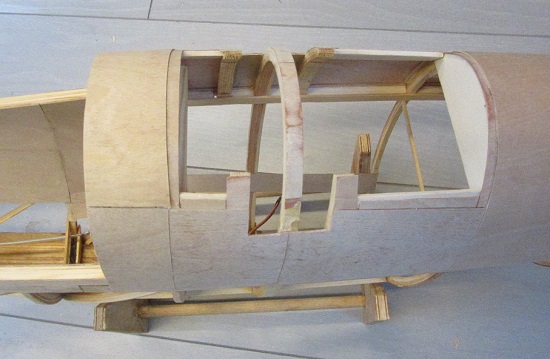
Bonjour a tous,
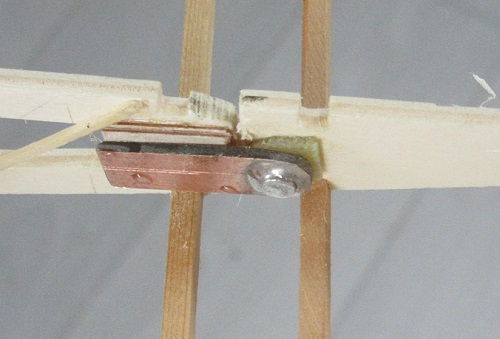
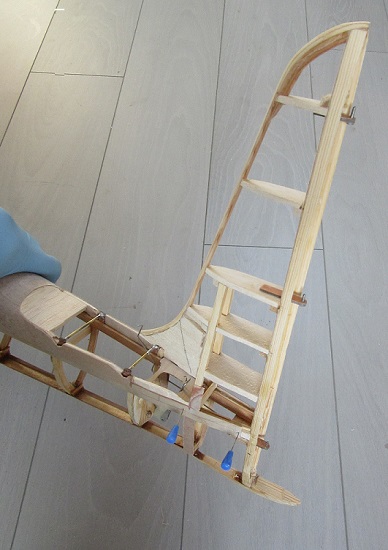
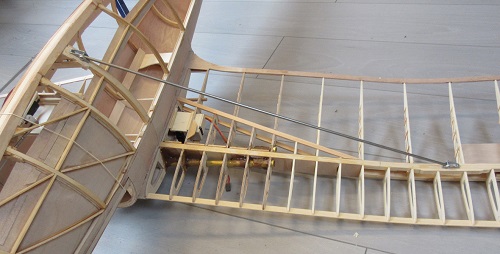
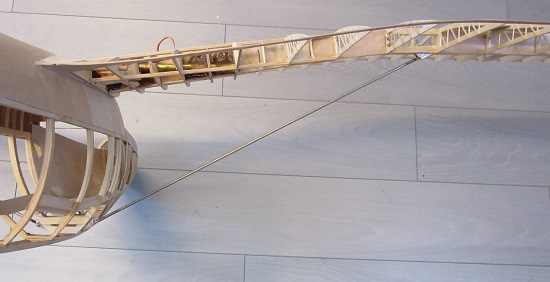
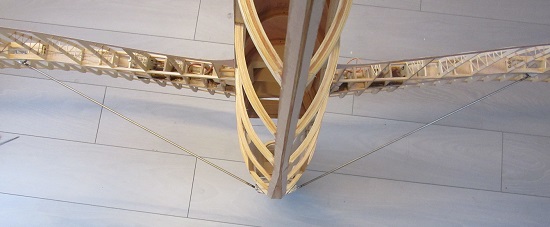
Actually I was a bit afraid that the pull-pull wires for the aileron actuation wouldn't work properly. I had to know if my planning worked! So I jigsawed ( ) the rudderhorns from 1mm epoxy/glass sheet, covered them with 0.8 mm ply. From 0.6 mm steel I bended loops so I could connect (and disconnect) the pull-pull wires to the rudderhorns. Put the wires through all the holes in the ribs to the servo arm and back.

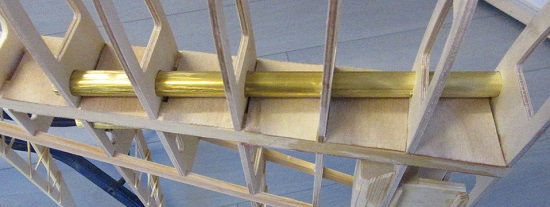
I had already soldered brass tubes to the pully unit as guidance for the steering cable of the outer rudderhorns of the aileron.
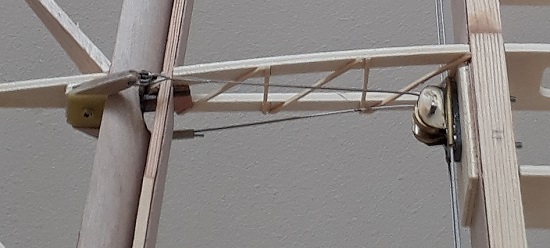
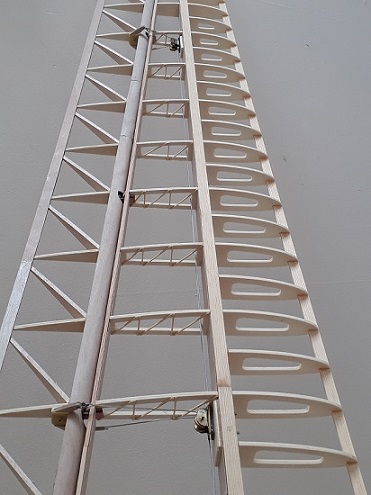
So I was very relieved it worked, I can now go further with the wings
To be continued,
Vincent |
|
| Revenir en haut de page |
|
|
Olli
Incurable Posteur


Inscrit le: 22 Juil 2006

Localisation: Germany
Âge: 56

|
|
| Revenir en haut de page |
|
|
caralp_laurent
Psycho Posteur


Inscrit le: 30 Jan 2006
Localisation: La Houssaye en Brie 77
Âge: 51

|
| Posté le: 11/11/2019 10:55 Sujet du message: |
|
|
|
Hi Vincent,
Bravo !
It's superb ! ![[amen]](images/smiles/amen.gif)
Friendly,
Lolo
Lolométéo, rétro addict ;o)
"On commence à vieillir quand on remplace ses rêves par des regrets"
Sénèque |
|
| Revenir en haut de page |
|
|
ManfredNeu
Accro Posteur


Inscrit le: 02 Jan 2009
Localisation: HalleWestfalen
Âge: 75

|
| Posté le: 16/11/2019 09:26 Sujet du message: |
|
|
|
Die Anlenkung des QR und alles andere - großartig
Gruß
Manfred |
|
| Revenir en haut de page |
|
|
bocorvin
Maniaco Posteur
Inscrit le: 17 Aoû 2015
Localisation: Hillegom
Âge: 77
|
| Posté le: 16/11/2019 12:59 Sujet du message: |
|
|
|
Thanks Olli, Lolo and Manfred for your encouraging comments!
I was indeed very relieved the ailerons worked OK!
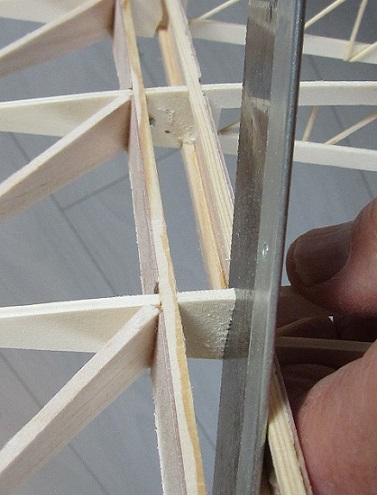
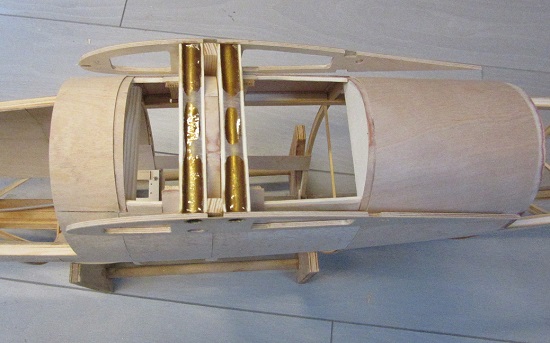
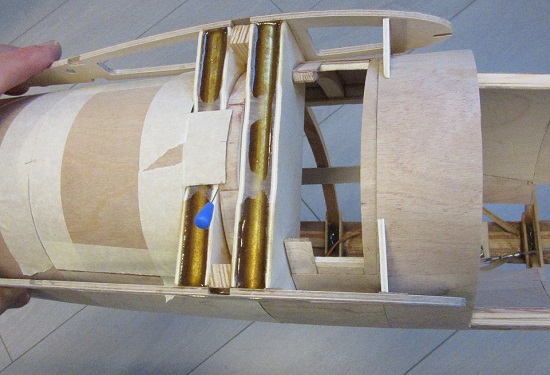
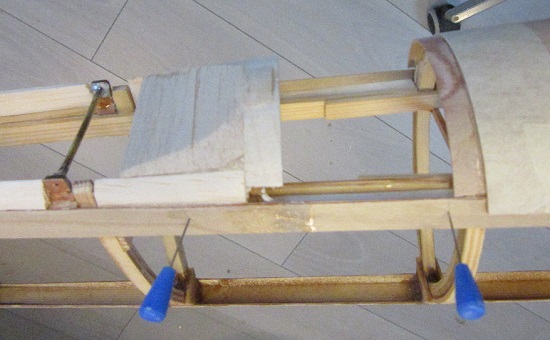
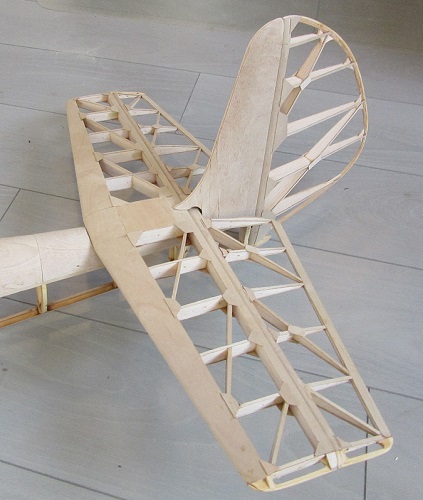
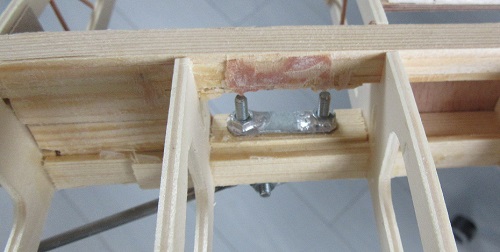
I went on with the fastening of the wingjoiner tubes. I liked to reinforce this part with glass tape/epoxy and filler/epoxy. Slow hardening in this case.
I left a gap between the tubes and the spar
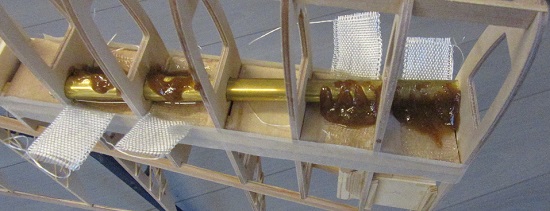
worked wet in wet
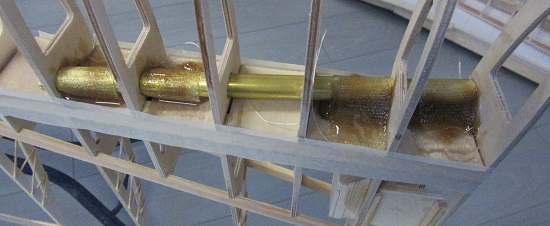
and cut of the surplus when its partially hardened
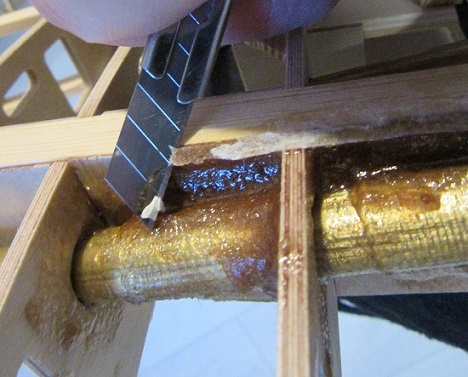
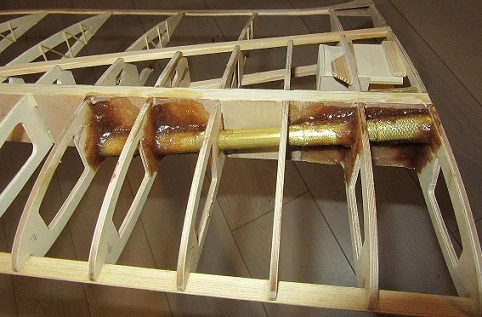
It always looks a bit messy, but I think its strong.
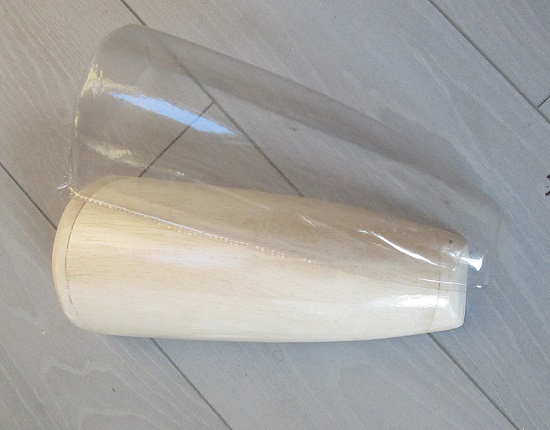
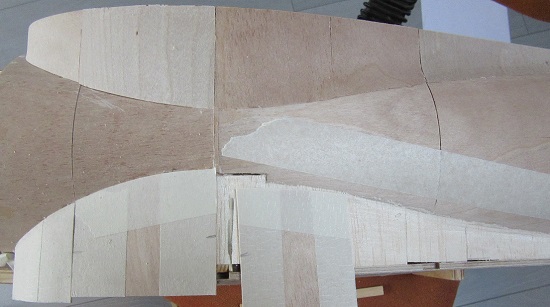
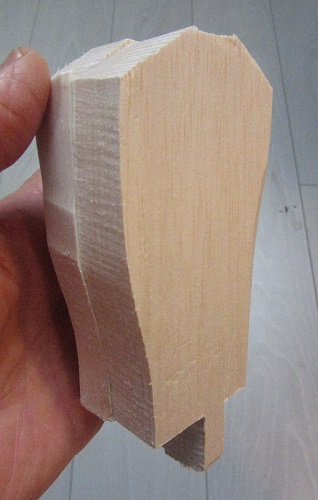
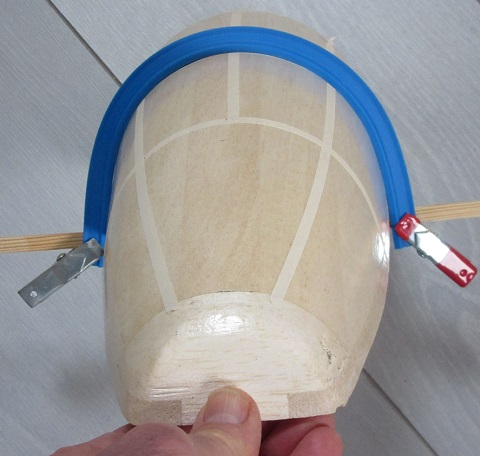
After this I went on with the canopy positive. Made from 6 layers 30mm balsa, sawed to fit in the fuselage
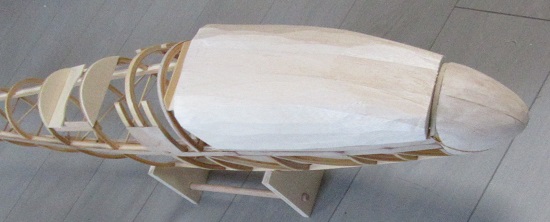
and then cutting. planing and sanding.
Its to big to get my fingers around it...... I used rubberbands, made from inner tyres of a moped
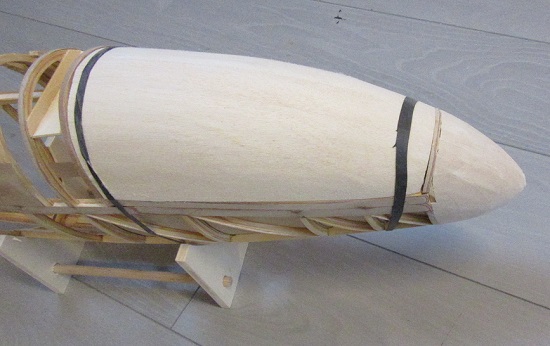
shaped the nose also a bit more.
Vincent |
|
| Revenir en haut de page |
|
|
Daniel Gmür
Apprenti Posteur


Inscrit le: 08 Déc 2011

Localisation: près Lac de Constance
Âge: 61
|
| Posté le: 21/11/2019 00:02 Sujet du message: |
|
|
|
| Wow! Nice to see, in which way your fighting for a stable but a very very non heavy Weight construction Maybe less than 50 gr/dm2 at the end? Thermal bomb! Will watch your Progress and further (metal details) with Great pleasure. Daniel |
|
| Revenir en haut de page |
|
|
Mad Doc
Accro Posteur

Inscrit le: 08 Juil 2014
Localisation: Wuppertal, Deutschland
Âge: 47
|
| Posté le: 21/11/2019 13:36 Sujet du message: |
|
|
|
Hi Vincent!
I really like your idea to use one servo on the ailerons, but separate the heading by cables on two places. Great, i will place this in my mind for further projects!
Greetings from Wuppertal,
Christian |
|
| Revenir en haut de page |
|
|
bocorvin
Maniaco Posteur
Inscrit le: 17 Aoû 2015
Localisation: Hillegom
Âge: 77
|
| Posté le: 21/11/2019 15:59 Sujet du message: |
|
|
|
Hello Daniel and Christian,
Thanks for your nice remarks
I am glad to share the building problems and solutions on this forum
Yes, I hope to get the weight below 4 kG, but I hope...
About the aileron actuation, it worried me if it should work.... The only thing I did, was making the lenghts af all the arms ( servo and both rudderhorns) exactly the same, in theory it must work and to my relief it did. I also learned a lot of all the wires of the Fokker FG 2.
http://www.retroplane.net/forum/viewtopic.php?t=4779&postdays=0&postorder=asc&start=90
The servo arm, lever, was critical, it must fit in the thickness of the wing, thats why I placed it at the root.
The beefing up of the wing joiners is because I want it to fly as a Gull with struts and also as a "cantilever Gull" without struts
Regards and LG
Vincent |
|
| Revenir en haut de page |
|
|
bocorvin
Maniaco Posteur
Inscrit le: 17 Aoû 2015
Localisation: Hillegom
Âge: 77
|
| Posté le: 23/11/2019 17:37 Sujet du message: |
|
|
|
Bonjour a tous,
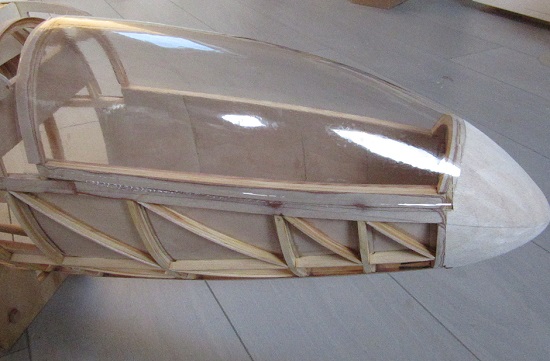
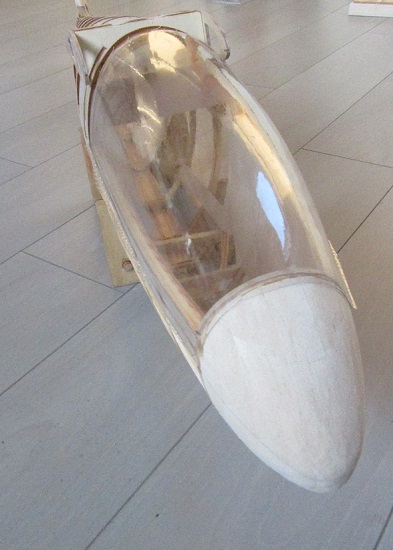
After sanding the canopy mold fit to the fuselage, I added extra material for the vacuum moulding
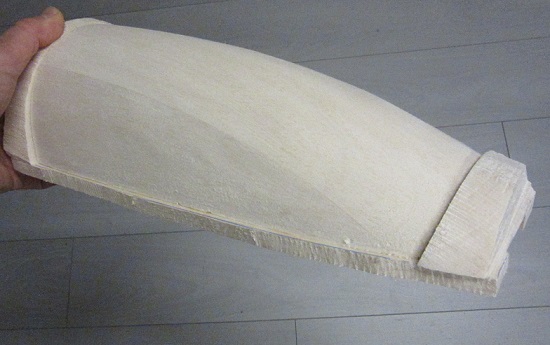
This mould was too big for my equipment, luckily a modelshop in the Netherlands does the job very well
it also fitted on the fuselage
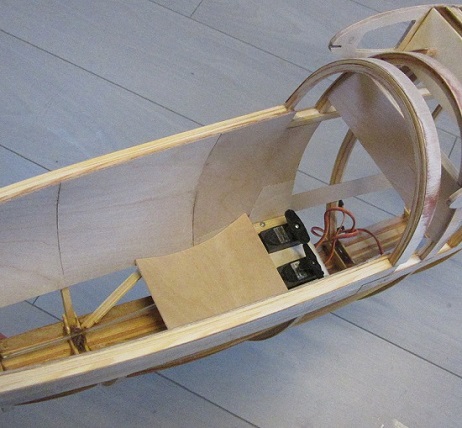
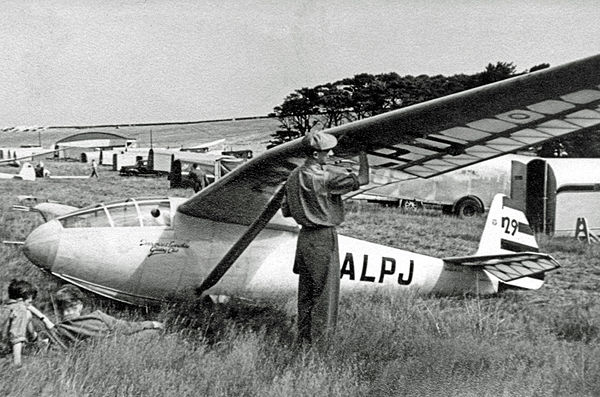
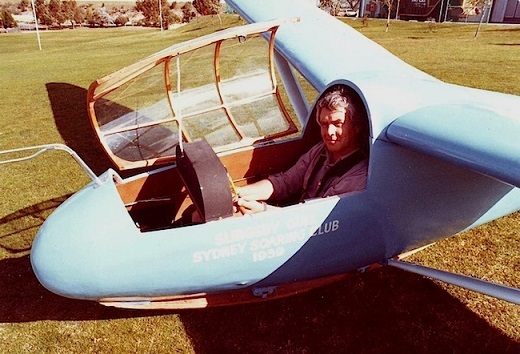
I was a bit puzzled about the seat of the pilot, the drawing was also not very clear about it ( I thought  ). A couple of days ago I found the first photo of the Gull with the pilot in the cockpit. ). A couple of days ago I found the first photo of the Gull with the pilot in the cockpit.

I my mind the head of the pilot is mostly more or less flush with the rear of the canopy, but not on this picture. So I had to change quite a lot of things  The servo's needed to go back quite a bit.... The servo's needed to go back quite a bit....
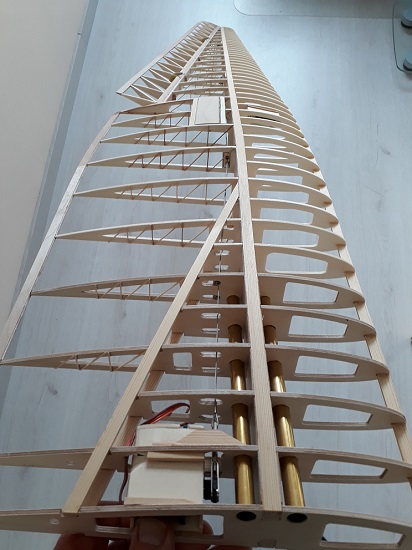
I put the servo for the tow release on the bottom
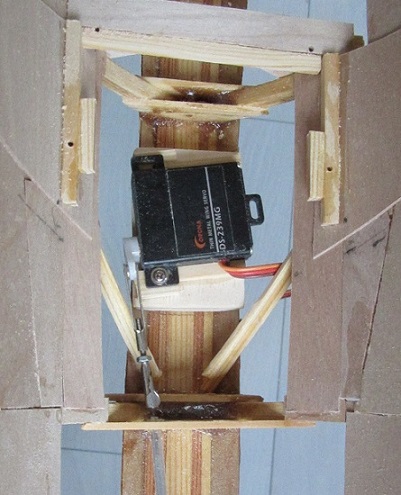
and the elevator and rudder on top
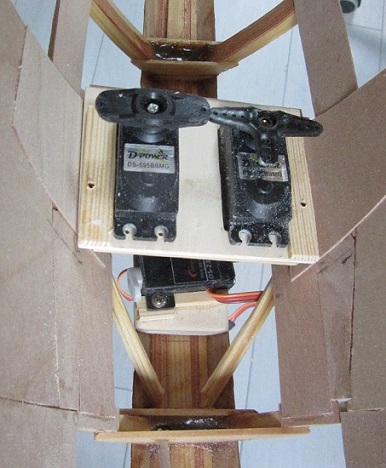
some figuring out.... But now there is space to put the pilot in correctly
Made the seat from a ply/balsa sandwich
to be continued
Vincent |
|
| Revenir en haut de page |
|
|
bocorvin
Maniaco Posteur
Inscrit le: 17 Aoû 2015
Localisation: Hillegom
Âge: 77
|
| Posté le: 28/11/2019 14:23 Sujet du message: |
|
|
|
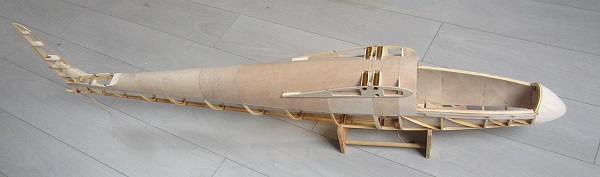
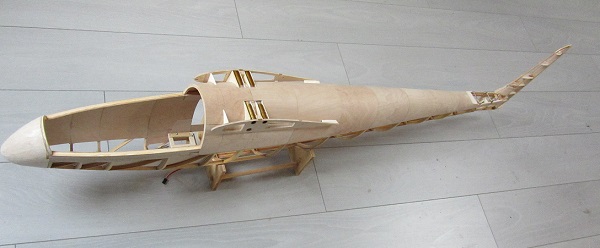
Hello everyone,
I started to put the ply on the fuselage, Because I made the middle section of the wing separate, I had some problems to solve ![[argh]](images/smiles/argh.gif)
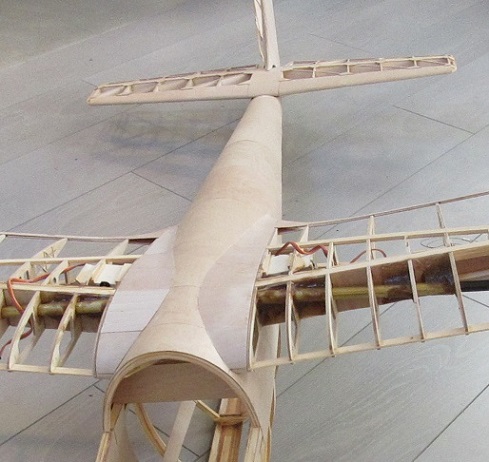
Now I could glue in the central part and cover the top side.
check that all fits and is horizontal
glued in both top panels (these seams will be under the fairing)
a epoxy fillet to attach these panels firmly
Now I could do the topside of the tailboom. After making a panel fit, I put in two pins to put the panel at the proper place. Now I glue the panel with thick cyano only at the stringer
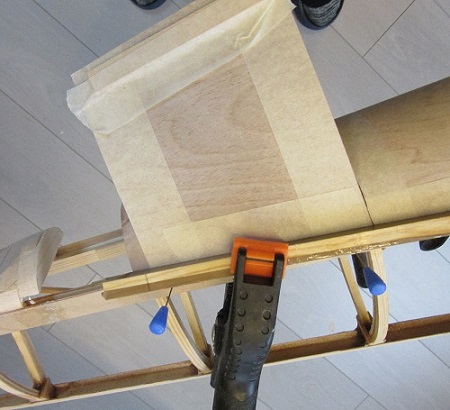
and after a minute I put on glue on the frames and other stringer and wrap the panel in place. To make the horizontal stabilizer fit to the fuselage, I had to make a balsa filler.
to be continued,
Vincent
|
|
| Revenir en haut de page |
|
|
Johannes
Serial Posteur

Inscrit le: 23 Juil 2007
Localisation: Leichlingen
Âge: 64

|
| Posté le: 28/11/2019 14:53 Sujet du message: |
|
|
|
Hi Vincent,
enifach super wie du baust
Johannes

|
|
| Revenir en haut de page |
|
|
caralp_laurent
Psycho Posteur
Inscrit le: 30 Jan 2006
Localisation: La Houssaye en Brie 77
Âge: 51
|
| Posté le: 28/11/2019 19:03 Sujet du message: |
|
|
|
Hi Vincent,
Good job, it's magnificent !
Friendly,
Lolo
Lolométéo, rétro addict ;o)
"On commence à vieillir quand on remplace ses rêves par des regrets"
Sénèque |
|
| Revenir en haut de page |
|
|
bocorvin
Maniaco Posteur
Inscrit le: 17 Aoû 2015
Localisation: Hillegom
Âge: 77
|
| Posté le: 28/11/2019 22:06 Sujet du message: |
|
|
|
Thanks Johannes and Lolo for your encouraging remarks!
Its slowly becoming a glider!
Vincent |
|
| Revenir en haut de page |
|
|
de Schaetzen Harold
Maniaco Posteur
Inscrit le: 06 Avr 2006

Localisation: Schilde
Âge: 78
|
| Posté le: 29/11/2019 12:29 Sujet du message: |
|
|
|
Beste Vincent,
Proficiat met jouw vooruitgang. Ik bewonder al jouw oplossingen. Indrukwekkend!
Ik maak mij een beetje zorgen met de aansluiting tussen de voorkant van de vleugel en de romp. Een gevoelige plek bij een brutale landing. (kan bij iedereen eens gebeuren). Zou jij daar geen extra harde houtstuk gebruiken. En ook een versterking aan de binnenkant van de romp voorzien?
Ik volg aandachtig het einde van jouw constructie.
Mvg.
Harold |
|
| Revenir en haut de page |
|
|
bocorvin
Maniaco Posteur
Inscrit le: 17 Aoû 2015
Localisation: Hillegom
Âge: 77
|
| Posté le: 29/11/2019 13:37 Sujet du message: |
|
|
|
Beste Harold,
Allereerst dank voor je lovende woorden!
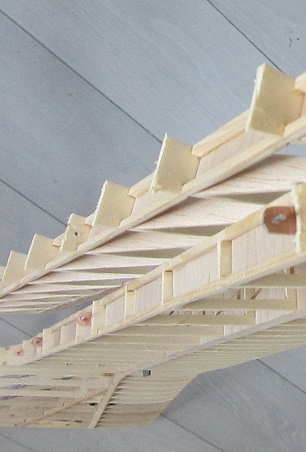
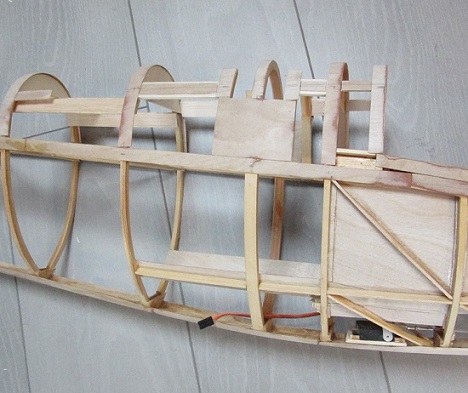
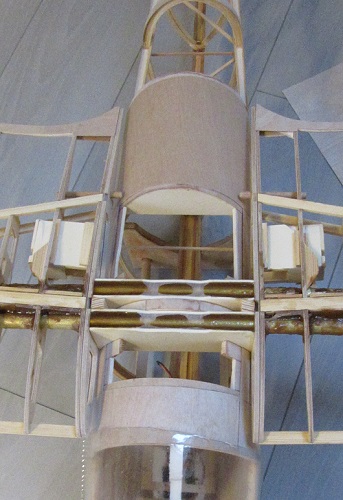
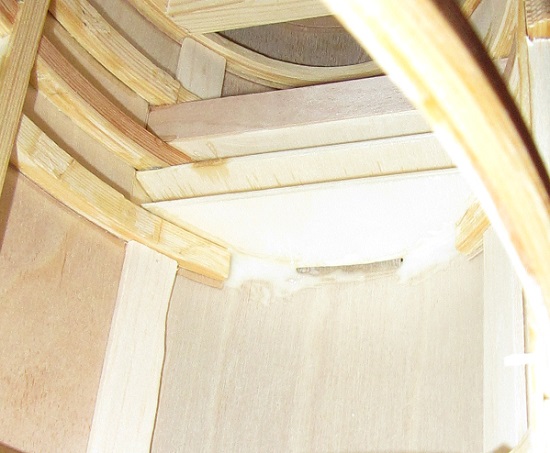
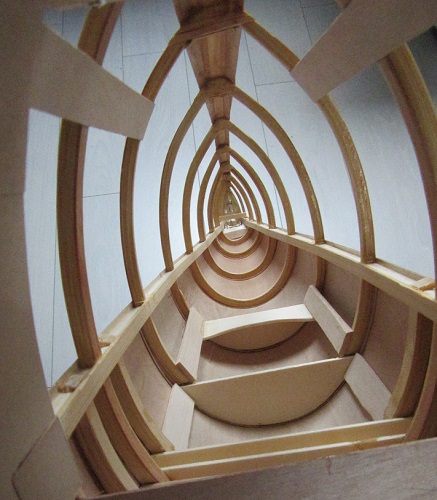
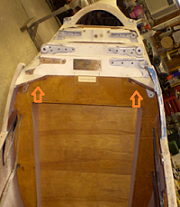
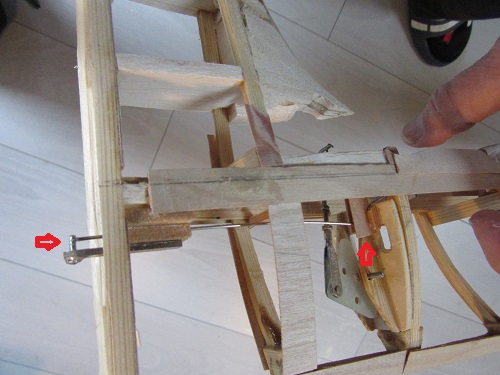
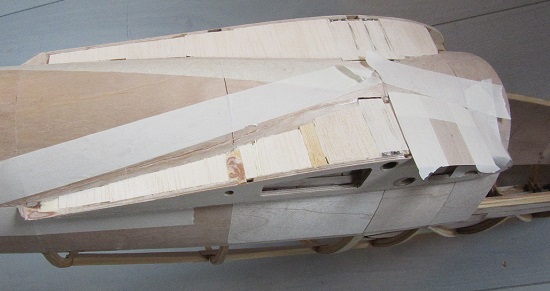
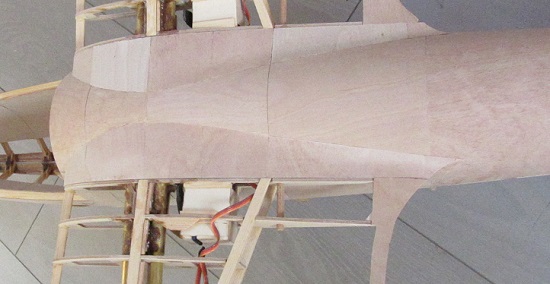
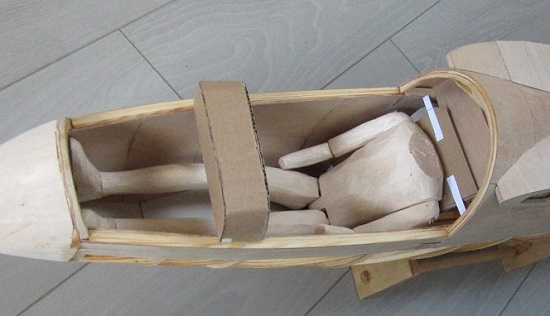
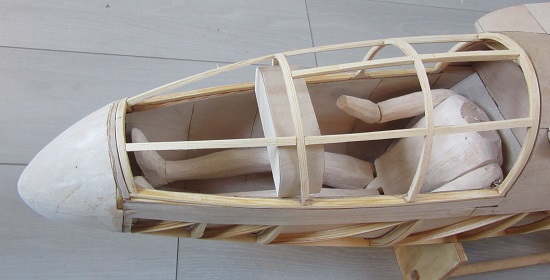
Over de vleugel ben ik helemaal met je eens en ik maak vaak genoeg harde en "minder gecontroleerde" landingen . Vervelend genoeg zit in dit geval het hoofd van de vlieger in de weg, zie onderstaande foto.
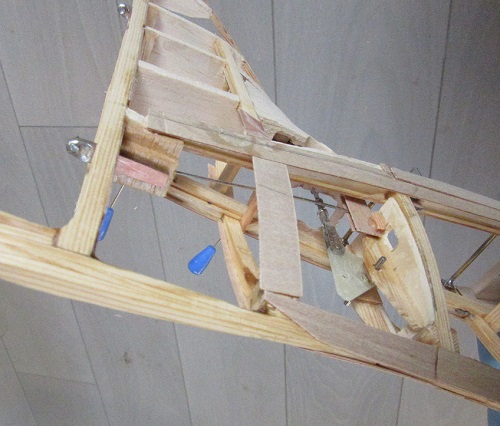
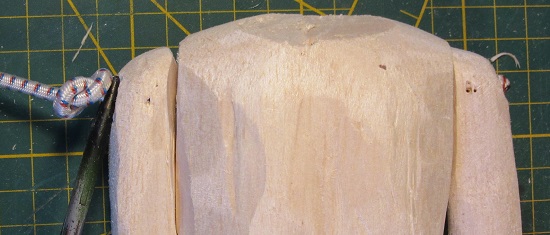
Omdat ik een gebroken koolstof pen heb gehad ( zie de reparatie van mijn Nemere 1:6 en ook de recente discussie van Clifton over zijn grote Fafnir)) heb ik besloten stalen pennen te gaan gebruiken (in elk geval 1, deze vleugel heeft twee pennen, dat weer door de V-stelling..)
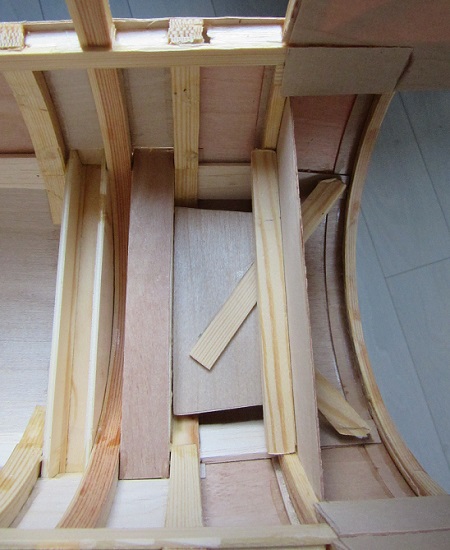
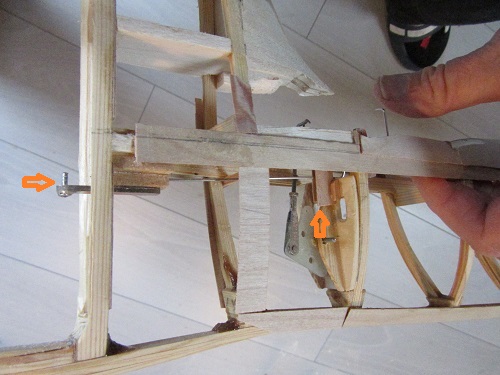
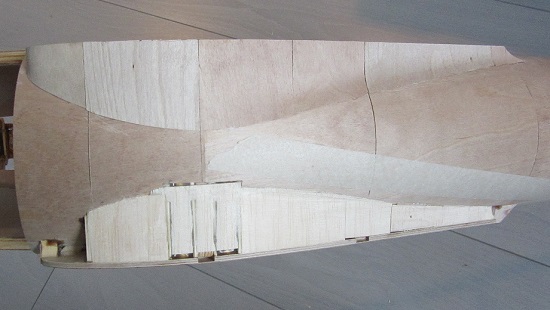
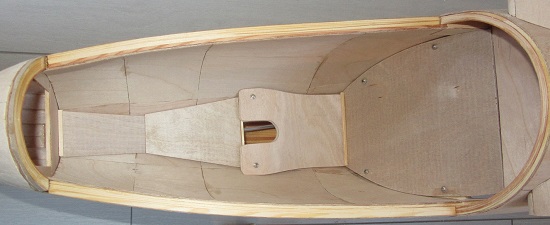
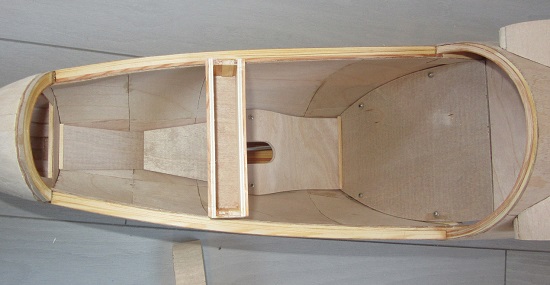
Hopelijk zijn deze pennen zo stijf dat de romp heel blijft. Maar ik had liever een stevig stuk hout ertussen gehad. Het spant achter zijn hoofd heeft wel een versterking, buiten de romp met een triplex plaat verbonden aan de rib, die het vloeistuk naar de vleugel gaat vormen. Aan de achterzijde heb ik iets dergelijks gemaakt. Op deze foto van de binnenkant zijn de versterkingen beter te zien.

Ik hoop dat het sterk genoeg is!
Met vriendelijke groet,
Vincent |
|
| Revenir en haut de page |
|
|
bocorvin
Maniaco Posteur
Inscrit le: 17 Aoû 2015
Localisation: Hillegom
Âge: 77
|
| Posté le: 08/12/2019 20:23 Sujet du message: |
|
|
|
Hello everyone,
The discussion with Harold stayed constantly at the back of my head.
(It was in Dutch; Harold was worried about lacking a transverse support for the leading edge)
The position of the pilot had surprised me, half his head behind the canopy, in fact between the leading edge of the wing. I also didn't like the missing of this support.
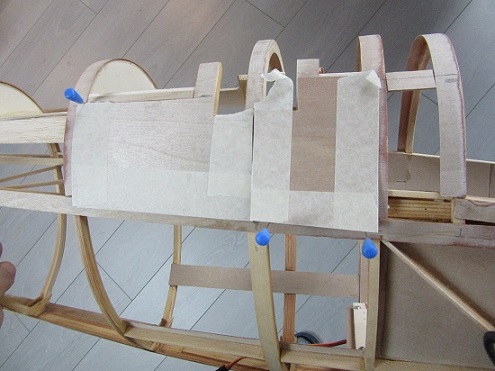
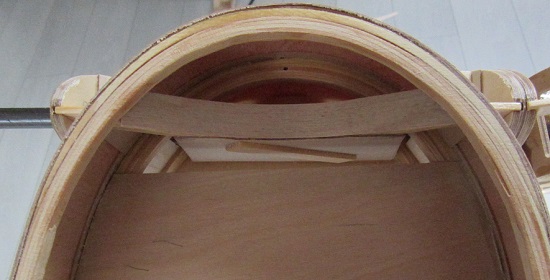
Then I discovered small triangular reinforcements in the real thing
It brought me upon this idea
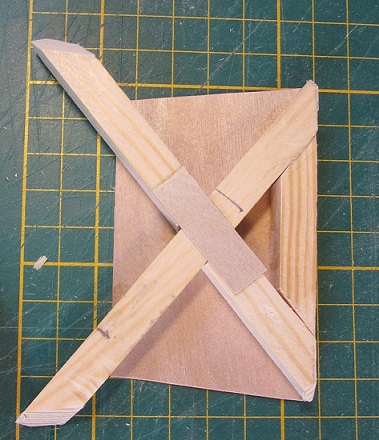
and placed in the fuselage
The leading edge glued in with gap-filling epoxy
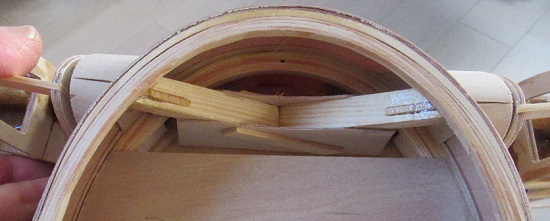
covered with ply
Hopefully this problem is solved, thanks Harold for your thinking!
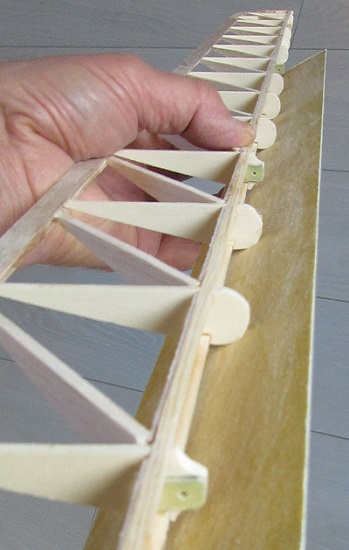
I went on with the vertical fin, first some photo's about the retaining wire for the rudder, so it can be easily taken off.
covered with ply
the rear of the fuselage made fit to the horizontal stabilizer
and the lower front of the fin covered with strips
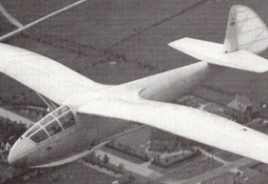
I couldn't find proper pictures of the covering of the real fin, maybe on this photo of the prototype (look also for the pilot, almost hidden in the fuselage)
Next was the fuselage/wing fairing, difficult to find pictures
There is no fairing at the underside and front topside
but the rear top is hard to find out. On the above photo of the prototype, there seems to be a quite big fairing, but on the other photo's.....
This funny part is a kind of lid, fitting on top of the fuselage, between the two wings, practically no fairing..

I decided to make the best of it and after a false start I made balsa fill-inns and covered it with pieces of pre bent ply

Still not sure if it is correct, but it looks quite appropriate.
To be continued,
Vincent |
|
| Revenir en haut de page |
|
|
de Schaetzen Harold
Maniaco Posteur
Inscrit le: 06 Avr 2006
Localisation: Schilde
Âge: 78
|
| Posté le: 09/12/2019 10:29 Sujet du message: |
|
|
|
Dear Vincent,
Congratulations for your final leading edge solution, Inside the hull.
And it leaves sufficient space for the pilot head.
And now, again, congratulations for the central fuselage head. Nearly an artistic work.
Best regards.
Harold |
|
| Revenir en haut de page |
|
|
bocorvin
Maniaco Posteur
Inscrit le: 17 Aoû 2015
Localisation: Hillegom
Âge: 77
|
| Posté le: 09/12/2019 16:26 Sujet du message: |
|
|
|
Dear Harold,
Thanks for your nice comments and also for your leading edge remarks.
Best regards,
Vincent |
|
| Revenir en haut de page |
|
|
bocorvin
Maniaco Posteur
Inscrit le: 17 Aoû 2015
Localisation: Hillegom
Âge: 77
|
| Posté le: 30/12/2019 13:04 Sujet du message: |
|
|
|
Hello everyone,
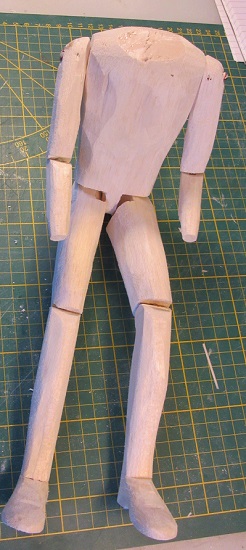
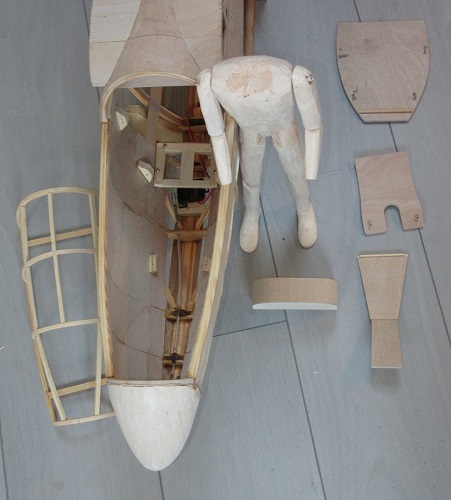
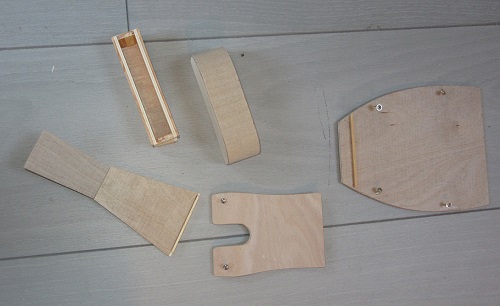
Now it was time to get the cockpit done. I couldn't find a proper drawing, so I thought to make the pilot first. Scaled a drawing of a man down to the proper size
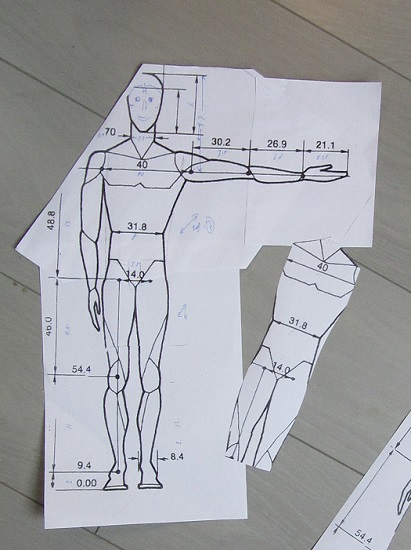
sawed the basic form out of 20 and 10mm balsa sheet
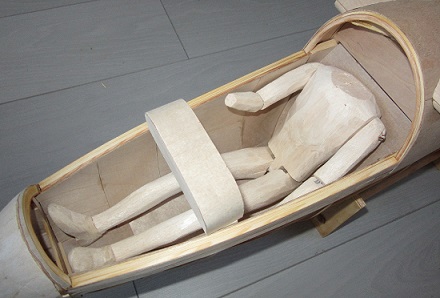
and after some cutting got the basic pilot.
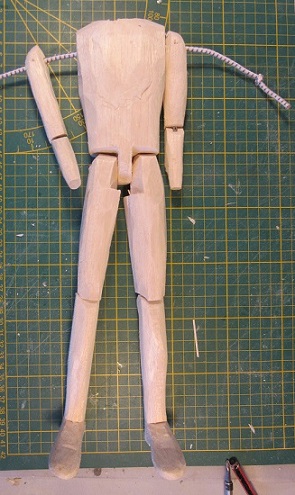
the knee and elbow hinges are fron Robart, the shoulder and hip joints are from 4mm shockcord. A few tricks, make a knot first, stretch it and cut it then, melt it, so the knot stays put.

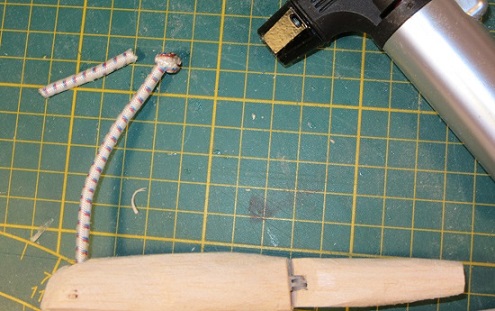
Hold it under a bit of tension
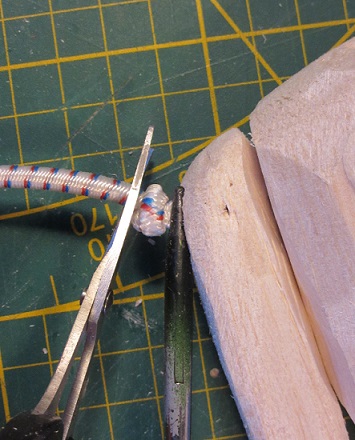

This pilot is quite flexible and also rugged
I couldn't find much of the instrument panel, but the one one the photo looks it looks very similar to one of the Petrel (I found photo's of different instrument panels )
I found this photo on scale soaring UK
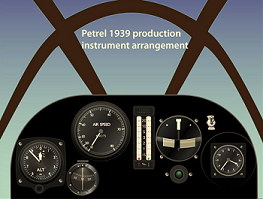
I made a mockup to get the right size and it appeared big enough to house the receiver battery
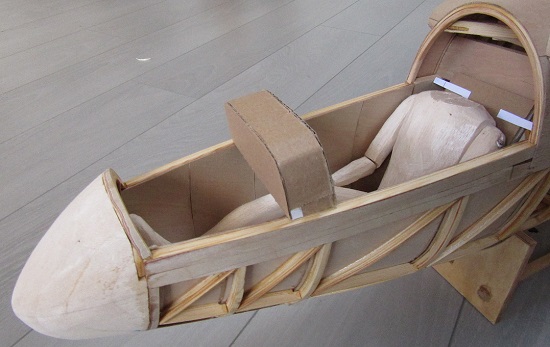
Having found a place for the battery, I could make the interior. With all kinds of jigs from cardboard I made the backrest, seat and floor.
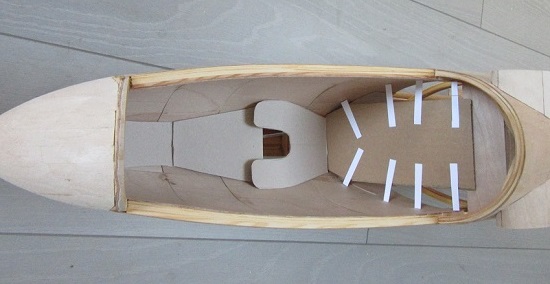
All the pieces in place
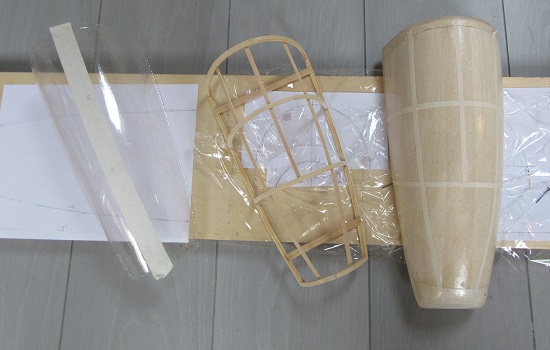
In the meantime I made the wooden construction of the canopy, taking the forms from the fuselage and from the canopy mold
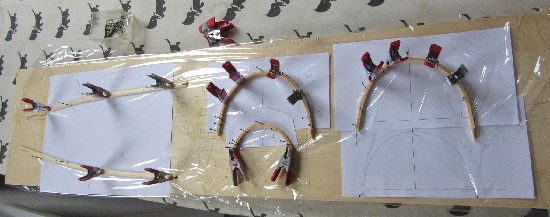
Laminated the frames in the same way as the fuselage frames
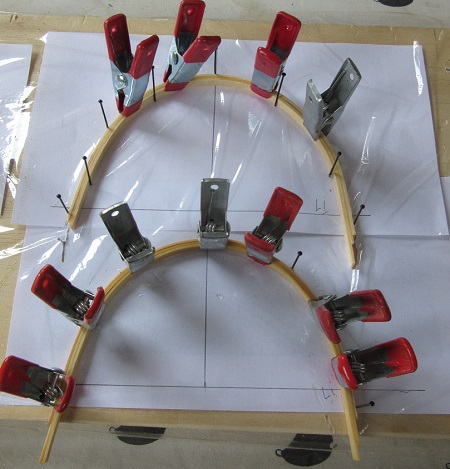
Holding it flat to get no distorsion when glueing in the stringers
Sanded it all flush
The clothing and the head are a different chapter!
Now I know all fits I can get on with the plane itself.
To be continued,
Vincent |
|
| Revenir en haut de page |
|
|
Claude Moinier
Apprenti Posteur

Inscrit le: 29 Mai 2009
Localisation: Pays-Bas
Âge: 73
|
| Posté le: 30/12/2019 20:34 Sujet du message: |
|
|
|
Bravo Vincent
I Fly without Engine
ClaudeM |
|
| Revenir en haut de page |
|
|
bocorvin
Maniaco Posteur
Inscrit le: 17 Aoû 2015
Localisation: Hillegom
Âge: 77
|
| Posté le: 30/12/2019 23:43 Sujet du message: |
|
|
|
Thanks for your nice comment Claude .
Vincent |
|
| Revenir en haut de page |
|
|
Johannes
Serial Posteur
Inscrit le: 23 Juil 2007
Localisation: Leichlingen
Âge: 64
|
| Posté le: 31/12/2019 09:54 Sujet du message: |
|
|
|
Hallo Vincent,
sehr schön mit wieviel Geschick du das Cockpit ausgebaut hast
Es macht Spaß deinen Baufortschritten zu folgen
Liebe Grüße und einen guten Rutsch ins neue Jahr
Johannes
|
|
| Revenir en haut de page |
|
|
de Schaetzen Harold
Maniaco Posteur
Inscrit le: 06 Avr 2006
Localisation: Schilde
Âge: 78
|
| Posté le: 31/12/2019 12:19 Sujet du message: |
|
|
|
Cher Vincent,
Magnifique, impressionnant.
Le travail d'un artiste qui est heureux de faire une belle uvre.
C'est finalement le résultat de beaucoup de réflexions et d'habilités.
Indrukwekkend!
De grootste vreugde van een artiest is het eindresultaat. Jij ben niet bang om oplossingen te zoeken en te vinden.
Iets bouwen met zijn eigen vingers in de grootste voldoening van een modelbouwer.
Gellukig nieuwjaar aan jou en jouw famillie.
Harold |
|
| Revenir en haut de page |
|
|
bocorvin
Maniaco Posteur
Inscrit le: 17 Aoû 2015
Localisation: Hillegom
Âge: 77
|
| Posté le: 01/01/2020 17:45 Sujet du message: |
|
|
|
Hallo Johannes et bonjour Harold,
Vielen dank fur das positieve commentar, es macht mit auch Spass daruber zu reden . Gutes 2020!
Merci Harold thanks for your encouragements, I can't stop this proces to find solutions, but in this hobby its nicely put to use.
Gutes Neujahr, Happy Newyear, bonne Anneé en gelukkig nieuwjaar
Vincent |
|
| Revenir en haut de page |
|
|
bocorvin
Maniaco Posteur
Inscrit le: 17 Aoû 2015
Localisation: Hillegom
Âge: 77
|
| Posté le: 05/01/2020 20:26 Sujet du message: |
|
|
|
Bonjour a tous,
It was time to make the struts. Now I like to fly it as a Gull I, with struts and also as a Gull III (also known as Cantilever Gull) without struts.
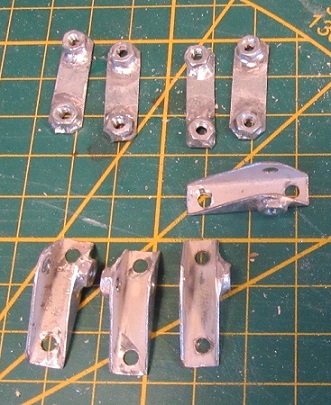
So the brackets should be completely demountable. I made the brackets from 0.5 mm mild steel (a side panel of an old computer ), cut roughly and drilled the holes

Fold it twice, so it became a "U"
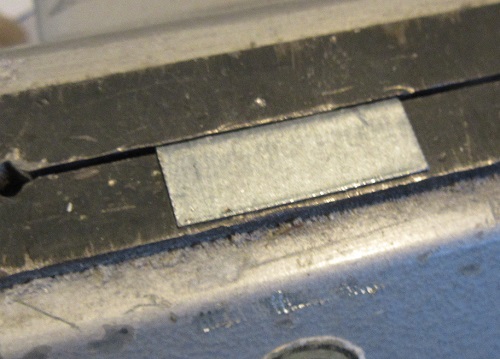
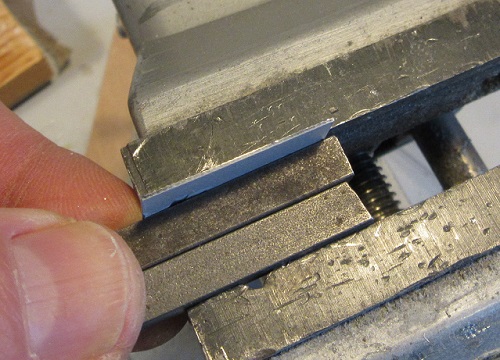

soldered with 145 degr solder a M3 nut on it
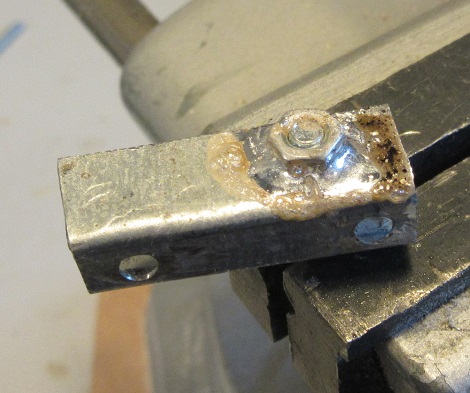
and cut, file and sanded it into shape
I drilled holes in the main frame
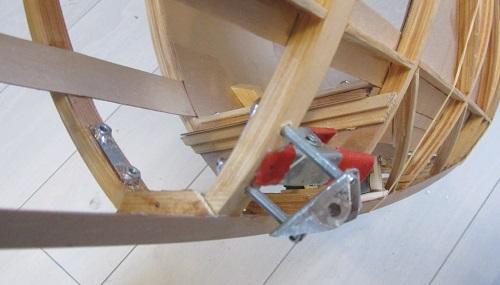
reinforced the frame and glued the plate with nuts with slow epoxy at the inside
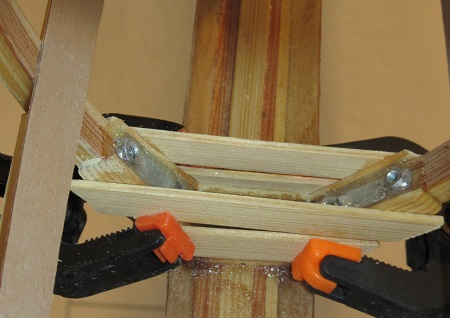
A similar job in the wing. Earlier I had filled up the space between upper and lower spar to fix two plates for the strut, but I could not make that demountable
Now I also had to reinforce the lower spar to compensate for the holes
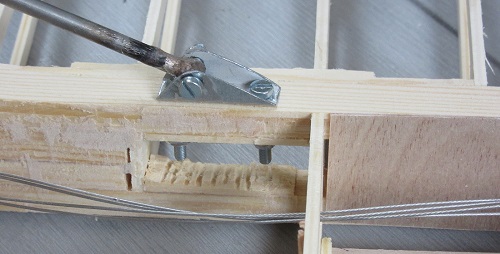
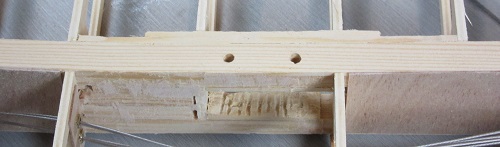
A clean wing when the brackets are screwed off and I have to tidy up the spar....
The original struts were made of metal tube and I had some 4mm stainless steel left. Soldered a piece of tube as an attachment with silver
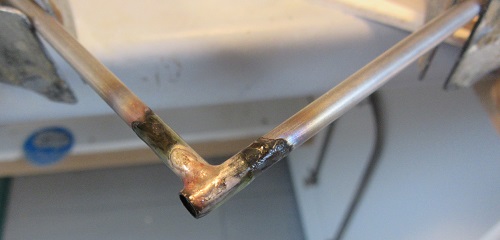
and after the soldering I cut it of.
It appeared that left and right were just as long, that was a good thing for my mood!

It had to be streamlined and also a bit stiffened

with balsa, LE spruce and carbon strips of 0.8mm, 3mm wide
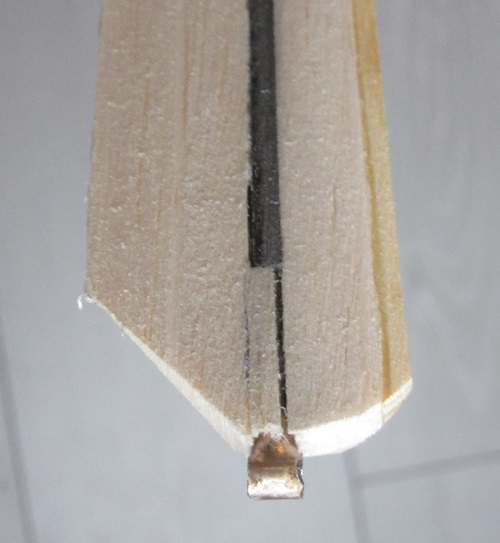
sanded into shape. Glued on 0.4mm ply (unfortunately I had quite a bad spot in these sheet, it was not good glued at some spots )
When I fly it with struts, I can use carbon wingjoiners, without I need steel wingjoiners
The struts are 52gr a piece, carbon wingjoiners are 120 the two, total weight is about 230 gr. The steel rod joiners are 600gr
I am curious ho it will affect the flying characteristics....
To be continued,
Vincent |
|
| Revenir en haut de page |
|
|
|