| Voir le sujet précédent :: Voir le sujet suivant |
| Auteur |
Message |
Clifton
Psycho Posteur


Inscrit le: 07 Mai 2014

Localisation: Anjou
Âge: 61

|
 Posté le: 23/03/2021 14:29 Sujet du message: Posté le: 23/03/2021 14:29 Sujet du message: |
  |
|
|
Je suis toujours surpris et épaté par les solutions que tu trouves. Bravo !

Slingsby Petrel, à mon gout le plus beau de tous, quoi que le Fafnir ... Ah ces ailes en mouette, un jour ....
Rien de ce qui est fini n'est jamais achevé tant que tout ce qui est commencé n'est pas totalement terminé (Pierre Dac) |
|
| Revenir en haut de page |
|
 |
caralp_laurent
Psycho Posteur

Inscrit le: 30 Jan 2006
Localisation: La Houssaye en Brie 77
Âge: 51

|
| Posté le: 25/03/2021 10:49 Sujet du message: |
|
|
|
Hi Vincent,
Goodjob, it's superb ! ![[clap]](images/smiles/Clap.gif)
Friendly,
Lolo
Lolométéo, rétro addict ;o)
"On commence à vieillir quand on remplace ses rêves par des regrets"
Sénèque |
|
| Revenir en haut de page |
|
|
bocorvin
Maniaco Posteur


Inscrit le: 17 Aoû 2015

Localisation: Hillegom
Âge: 77

|
| Posté le: 27/03/2021 20:48 Sujet du message: |
|
|
|
Merci Philippe et Lolo, J'ai bien besoin de vos mots apres le probleme avec le "V" dans les ailes.....
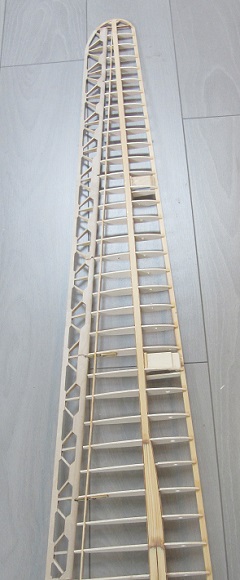
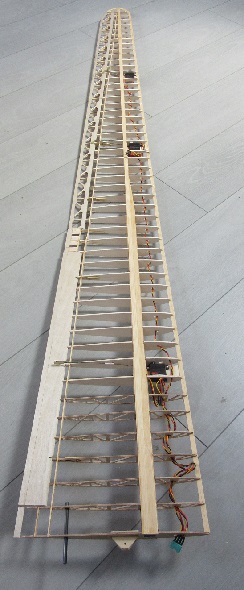
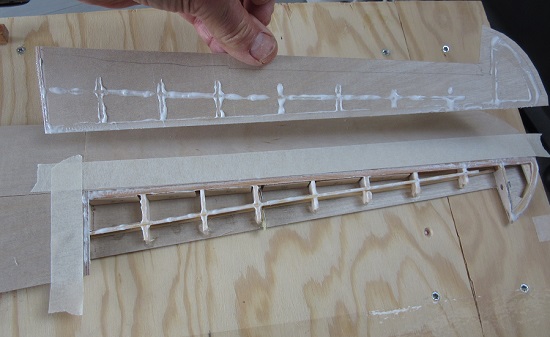
Now that the basic structure of the wings was ready, it was time for the ailerons and flaps. First the ailerons.
I found differences between the ribs in the drawing and the photos
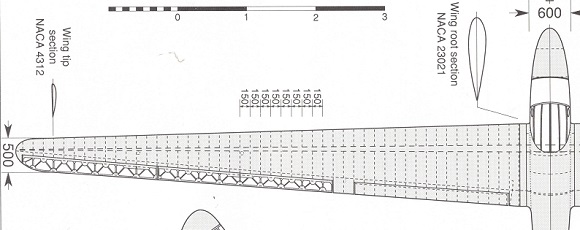
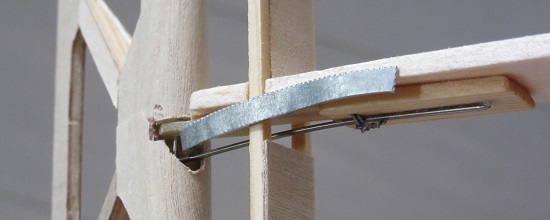
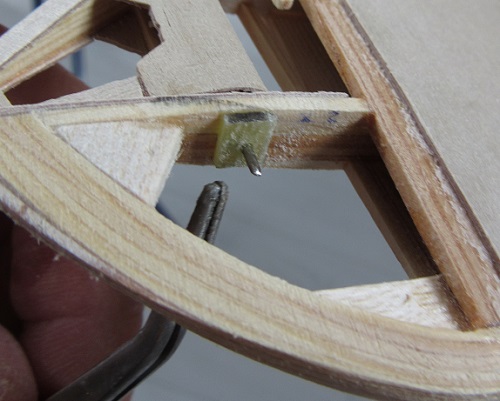
In the drawing, the aileron even seems to consist of two parts, of which nothing can be found in the photo. I therefore decided not to divide the aileron in two parts. Another problem was that the aileron was enclosed on both sides. I therefore chose the same hinges as the horizontal stabilizer. The aileron remains removable. With the help of a curved strip you can unlock all hinges at the same time, place the aileron, and then remove
the strips.
After cutting off the aileron from the wing, I realized how long and narrow it was, 115cm long and 4.5cm wide.
The profile choice did not help either, unfortunately. The aileron was therefore only 6-7mm thick. I also became convinced that I had to control the aileron in two places and luckily was able to find place for an extra servo in the wing.
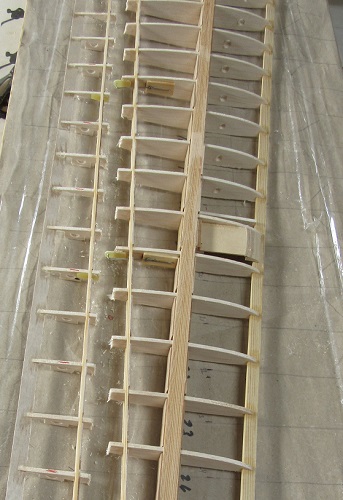
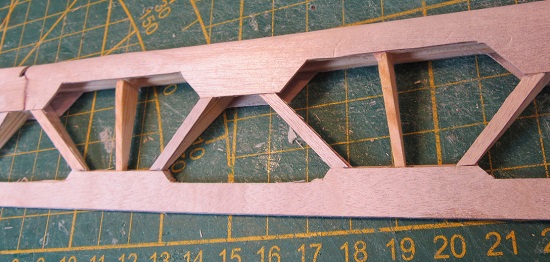
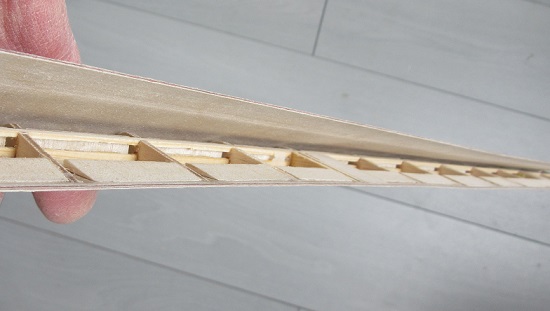
The balsa ribs in the aileron were very thin and fragile. So I replaced the balsa ribs with 2mm solid spruce, took out one, replaced it with spruce, went on to the next, so that I kept the dimensions
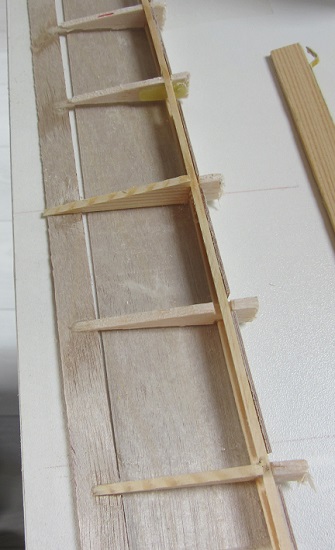
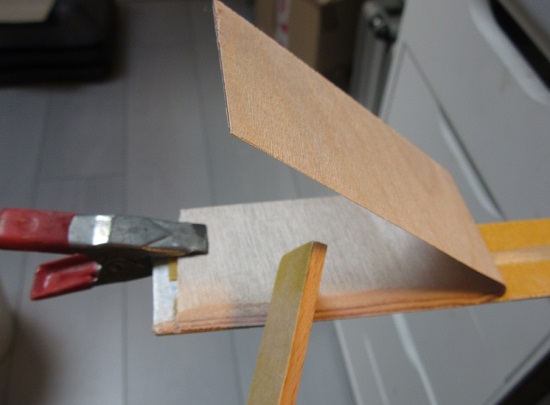
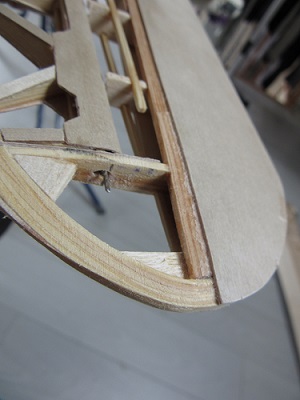
I wanted to make a plywood D section for the nose of the aileron. With boiling water I bent U profiles of 0.6 plywood around a 6mm tube and let them dry. I slid the aileron skeleton into this profile and clamped it to a plate with a batten. I had covered both the batten and the board with tape, in order not to get adhesion with glue. I also built in some twisting. I set the plank upright and dripped thin cyano between the rib skeleton and the plywood U profile.
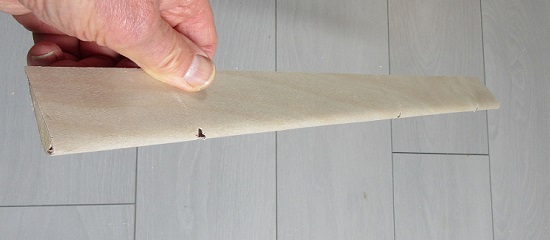
. Now I had a much firmer unit. I further built up the rear frame with 0.6mm plywood and sawed, cut and sanded
the U profile and the TE into shape. Then I added capstrips and the aileron was finished roughly, still needed some sanding.
Vincent(DB) |
|
| Revenir en haut de page |
|
|
caralp_laurent
Psycho Posteur
Inscrit le: 30 Jan 2006
Localisation: La Houssaye en Brie 77
Âge: 51
|
| Posté le: 28/03/2021 19:38 Sujet du message: |
|
|
|
![[good]](images/smiles/good.gif) ![[amen]](images/smiles/amen.gif)
Lolo
Lolométéo, rétro addict ;o)
"On commence à vieillir quand on remplace ses rêves par des regrets"
Sénèque |
|
| Revenir en haut de page |
|
|
ManfredNeu
Accro Posteur


Inscrit le: 02 Jan 2009

Localisation: HalleWestfalen
Âge: 75

|
| Posté le: 29/03/2021 10:30 Sujet du message: |
|
|
|
Gute Idee, das mit dem Verkleiden der Querrudernase , und einfach ein klasse Modell .
Manfred |
|
| Revenir en haut de page |
|
|
bocorvin
Maniaco Posteur
Inscrit le: 17 Aoû 2015
Localisation: Hillegom
Âge: 77
|
| Posté le: 29/03/2021 20:06 Sujet du message: |
|
|
|
Merci Lolo und Danke Manfred,
Das Idee um dass so zu verleimen ist aus Not geboren 
Veileicht hatte es auch met Weissleim geklappt, aber das sinds zoviel oberflache und so hats einfach geklappt.
Es fehlt noch etwas nacharbeit...
(hoffentlich nicht alzu viel Fehler in mein Deutch  ) )
Vincent (DB) |
|
| Revenir en haut de page |
|
|
bocorvin
Maniaco Posteur
Inscrit le: 17 Aoû 2015
Localisation: Hillegom
Âge: 77
|
| Posté le: 09/04/2021 19:52 Sujet du message: |
|
|
|
Bonjour a tous,
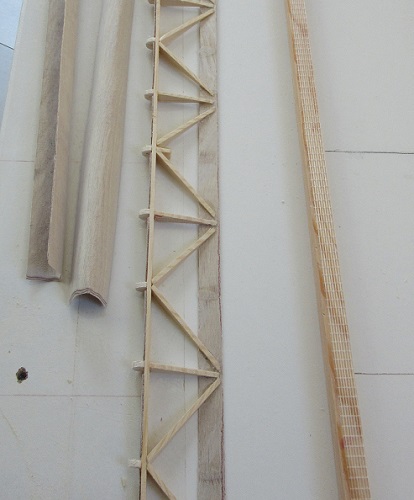
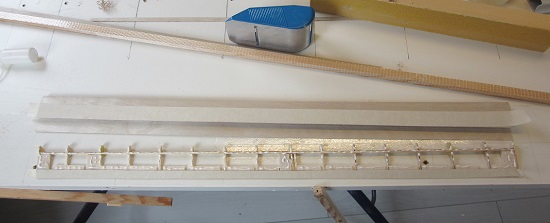
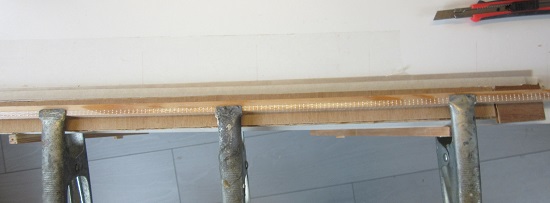
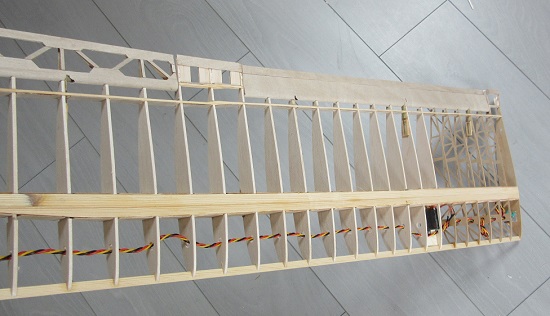
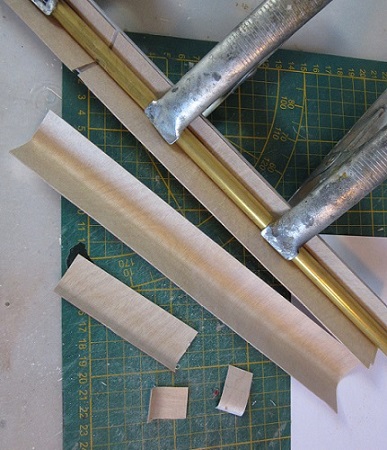
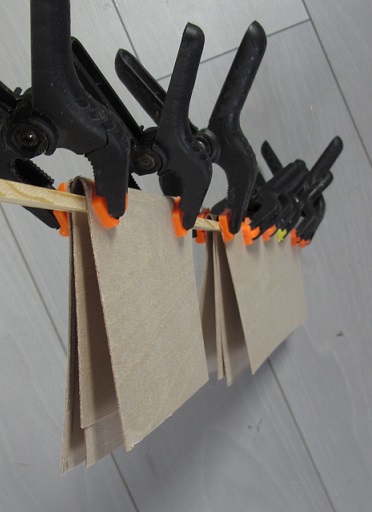
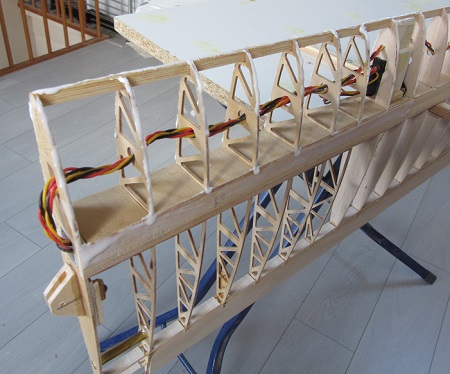
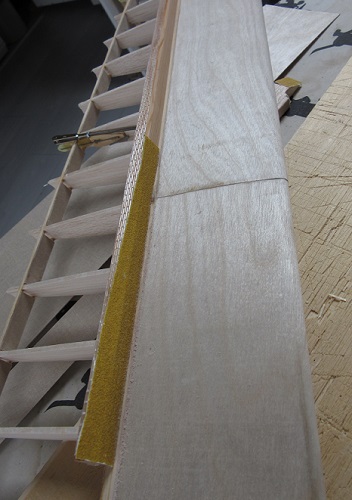
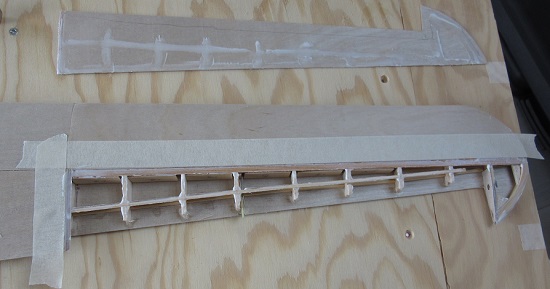
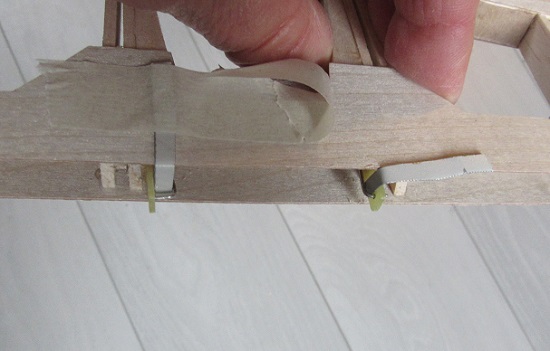
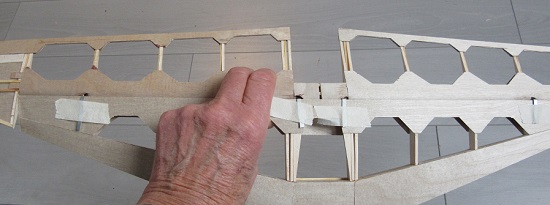
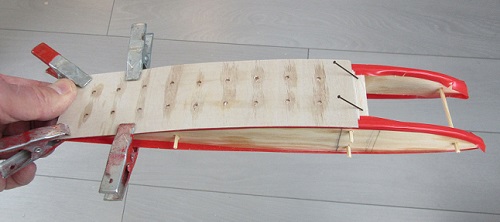
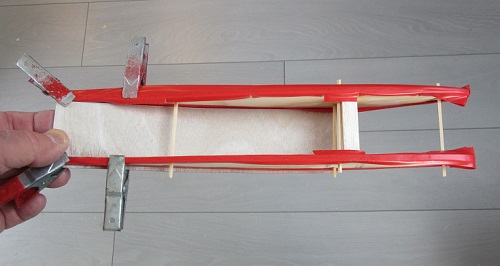
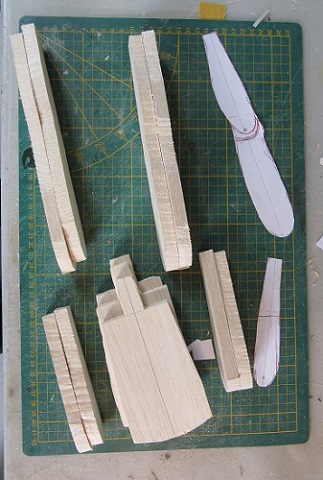
After I built the second aileron, I went on with the flaps. These are much shorter (56cm) than the ailerons and completely sheeted. They are even thinner than the ailerons, less than 6mm thick. So I liked to sheet them in one go. I took a strip of 9cm wide, 0.6mm plywood, and bended it around a 6mm round rod, whilst pouring over with boiling water, see also this video https://www.youtube.com/watch?v=KoZUbuMlBck (sorry, Dutch subtitled). Then I clamped and let it dry
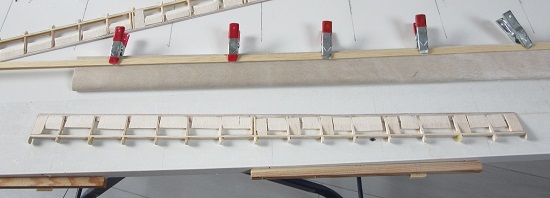
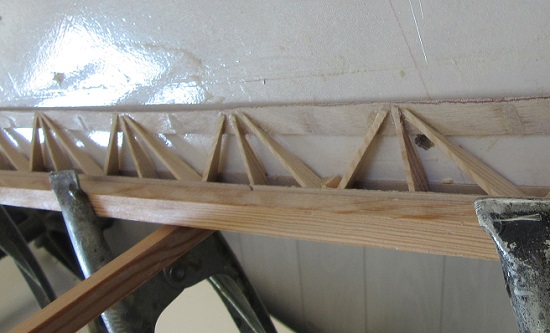
Also on the photo is the backbone consisting from the ribs, main spar, back frame with balsa filler strips. It is a very weak skeleton. By fitting this skeleton into the folded plywood, I could mark, cut and sand the plywood.
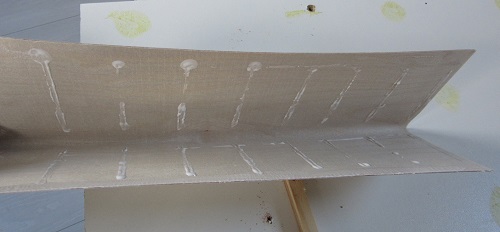
Covered the structure with PVA
and clamp it with a 10X10mm batten en strps of 4mm ply.
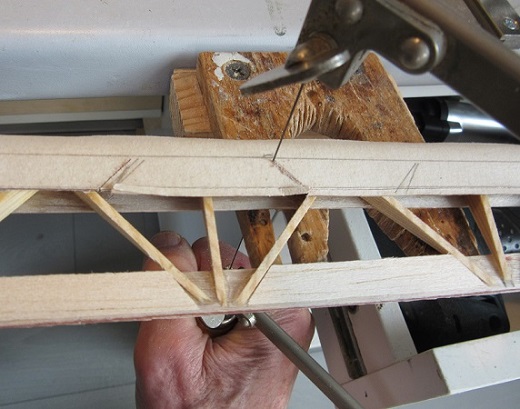
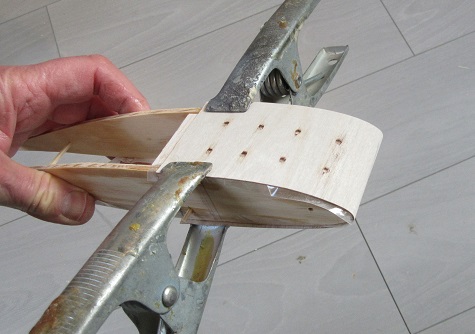
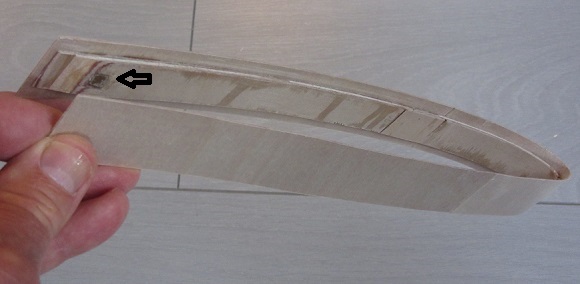
After the glue had dried I could fold the plywood open, and I drilled 1mm from the inside pilot holes so that I could make the openings at the hinges and rudderhorn later.
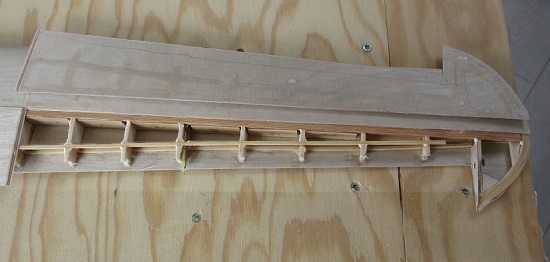
I smeared the top of the ribs with glue and clamp the whole thing together, just like before.
With a Dremel I made the openings for the hinges and after some adjustments it fitted neatly into the wing.
Vincent(DB) |
|
| Revenir en haut de page |
|
|
Olli
Incurable Posteur


Inscrit le: 22 Juil 2006
Localisation: Germany
Âge: 56

|
|
| Revenir en haut de page |
|
|
bocorvin
Maniaco Posteur
Inscrit le: 17 Aoû 2015
Localisation: Hillegom
Âge: 77
|
| Posté le: 22/04/2021 13:34 Sujet du message: |
|
|
|
Hello everyone,
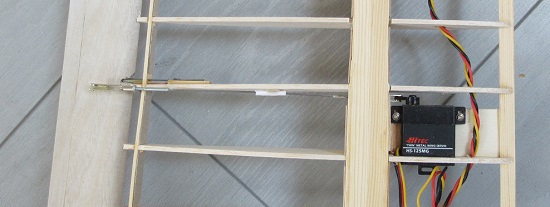
I wanted to keep the operation of the ailerons and flaps simple, this time not with pull / pull wires, as with the Gull. The pull / pull cables in the wings are nice, but weigh a bit more and there is a bit more friction which is not good for the precision, unfortunately. I thought to make a pull / push rod on the bottom and a dummy control on the top. Unfortunately I couldn't figure out how the flaps were operated, so I also chose a pull-push rod on the bottom of the wing. On the basis of a photo I tried to estimate the size of the rudderhorns.
I came up with very small horns, I drew them twice too big (by hand ..)
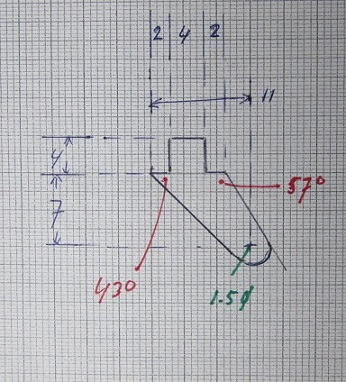
My friend Adri was so kind to CNC quite a few. Afterwards the size seemed quite correct
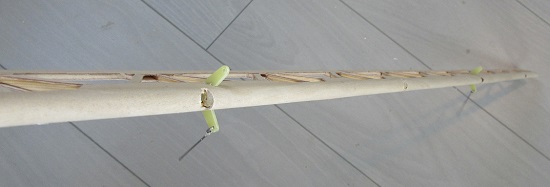
First I made the dummy control at the top of the wing from 0.8mm steel wire, with a non-functional clip
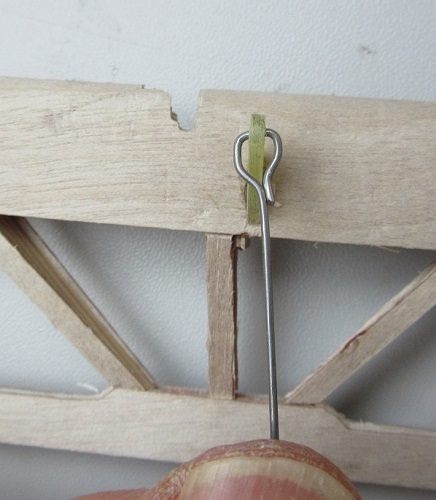

This rod can move freely in a plastic tube glued to a rib. I made the functioning pull / push rod from an M2 threaded rod with quick links
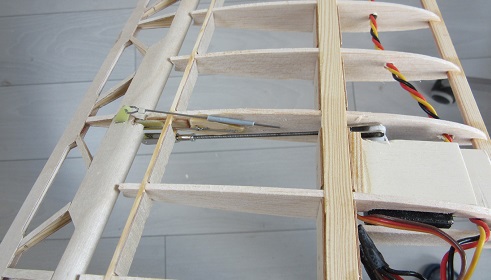
To remove the aileron (to put the Diacov on) I disconnect the quicklinks, unlock the hinge pins and then I can detach the aileron with dummy rods and all. The flaps only have a pull-push rod at the bottom
I make these from 1mm steel wire with a guide tube against bending. After some soldering I could check the working of the flaps and ailerons, they worked nicely.
Vincent (DB) |
|
| Revenir en haut de page |
|
|
texier
Accro Posteur

Inscrit le: 02 Mar 2006
Localisation: Monbrun (32)
Âge: 50

|
| Posté le: 28/04/2021 18:18 Sujet du message: |
|
|
|
Hello Vincent,
Interesting and realistic tip this dummy push rod
Sylvain.
On appelle idées claires celles qui sont au même degré de confusion que les siennes. |
|
| Revenir en haut de page |
|
|
bocorvin
Maniaco Posteur
Inscrit le: 17 Aoû 2015
Localisation: Hillegom
Âge: 77
|
| Posté le: 30/04/2021 11:15 Sujet du message: |
|
|
|
Bomnjour a tous,
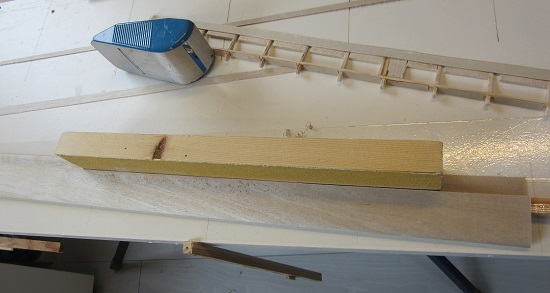
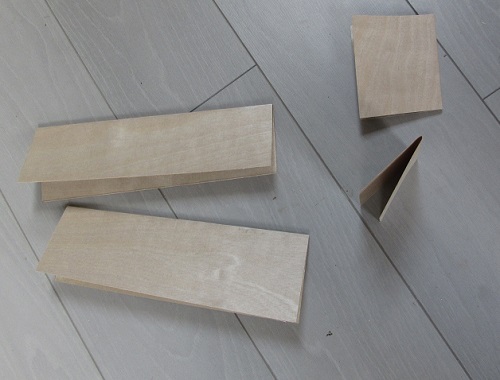
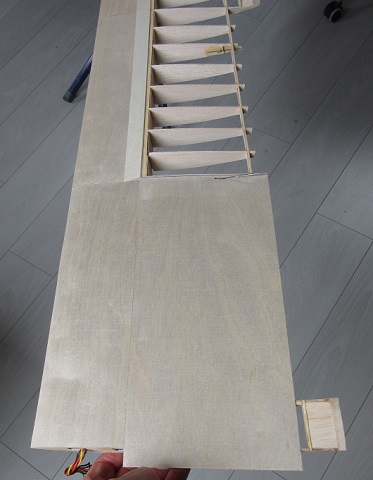
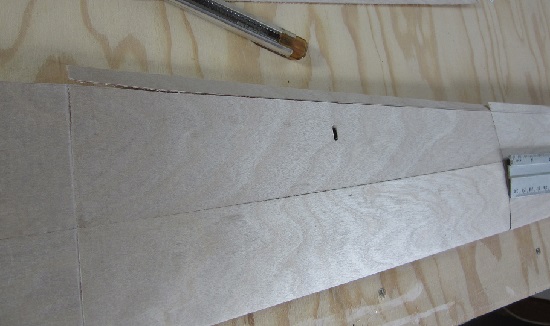
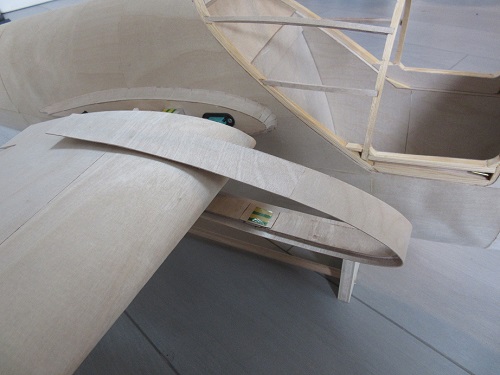
The fairing (Farman?) from the wing to the fuselage had to be made. In the original there was a gap between the wing and the fuselage of about 10 centimeters, just big enough to mount the wings. After assembly a strip of plywood went over it
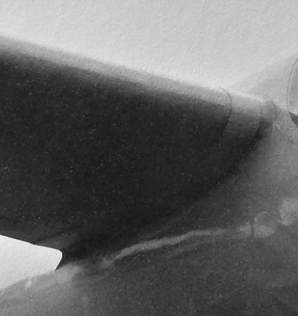
I also wanted to make it like that, seemed nice to me.
In the fairing, the grain of the plywood must run the length of the wing and thus be bent transversely to the grain. I made a small video how I managed to do that
https://www.youtube.com/watch?v=1W6lXoVasmw
After bending I let the plywood dry, cut 1 side (which was needed for the bending)
and then saw off pieces. I started with the TE, narrow pieces
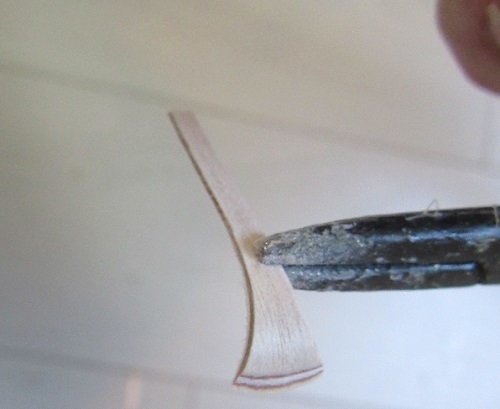
, beveled with a Proxxon power file
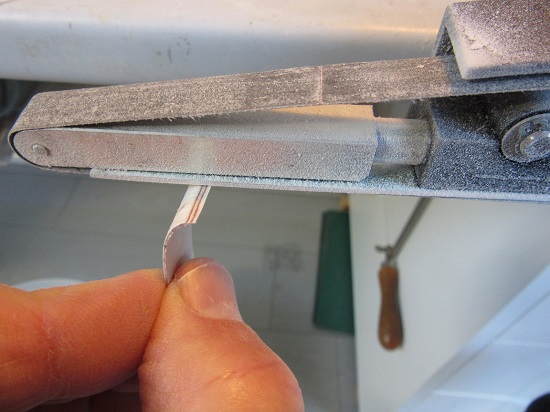
with which you can subtly shape those tiny pieces. They are glued to the end rib and fuselage with thick cyano

Where the curvature in the end rib decreases, I also take longer pieces
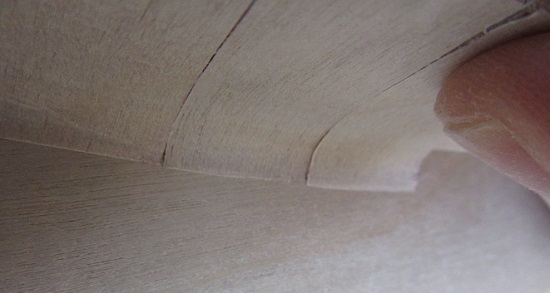
With something long round I keep the pieces in place.
Sometimes it goes wrong and then I have to cut out a piece. Finally it looks like this
Here the roughly finished fairing with the gap to the wing, which will be covered by a detachable plywood thing. I have to do the sheeting of the wing first.
Vincent(DB) |
|
| Revenir en haut de page |
|
|
Johannes
Serial Posteur


Inscrit le: 23 Juil 2007
Localisation: Leichlingen
Âge: 64

|
| Posté le: 30/04/2021 13:02 Sujet du message: |
|
|
|
Hi Vincent,
sieht spitzenmäßig aus

|
|
| Revenir en haut de page |
|
|
Sed
Maniaco Posteur

Inscrit le: 13 Mai 2015
Localisation: Villeurbanne
Âge: 57
|
| Posté le: 30/04/2021 13:20 Sujet du message: |
|
|
|
Bonjour Vincent,
Magnifique coffrage , le résultat est nickel !
Serge |
|
| Revenir en haut de page |
|
|
bocorvin
Maniaco Posteur
Inscrit le: 17 Aoû 2015
Localisation: Hillegom
Âge: 77
|
| Posté le: 01/05/2021 19:36 Sujet du message: |
|
|
|
Danke Johannes et merci Greg 
Vincent(DB) |
|
| Revenir en haut de page |
|
|
ThomasF
Incurable Posteur
Inscrit le: 16 Jan 2010
Âge: 64
|
| Posté le: 01/05/2021 19:52 Sujet du message: |
|
|
|
Das ist wirklich klasse Vincend, wenn Du da fertig bist schicke ich Dir meinen Rumpf der AFH-4, da habe ich diese Arbeit auf nch dem einfliegen verschoben!
Gruß
Thomas |
|
| Revenir en haut de page |
|
|
bocorvin
Maniaco Posteur
Inscrit le: 17 Aoû 2015
Localisation: Hillegom
Âge: 77
|
| Posté le: 01/05/2021 19:58 Sujet du message: |
|
|
|
Hallo Thomas,
Muss ich die Rumpf doch mal mitnehmen nach Retroplane.....
Hoffentlich gibt noch genugend raum in mein Auto 
LG
Vincent(DB) |
|
| Revenir en haut de page |
|
|
bocorvin
Maniaco Posteur
Inscrit le: 17 Aoû 2015
Localisation: Hillegom
Âge: 77
|
| Posté le: 09/05/2021 20:52 Sujet du message: |
|
|
|
Bonjour a tous,
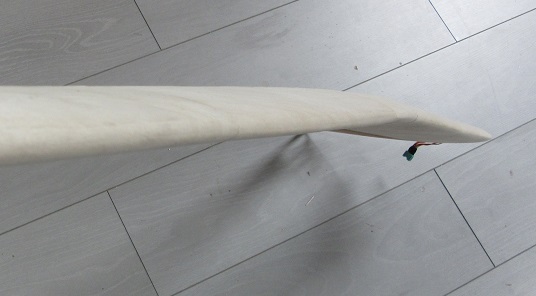
I always find it difficult to sheet the wing nose with ply . I enjoyed gluing by securing semi-dried PVA with a foil iron. I was unable to bend the plywood sharply enough with water and a foil iron. This is also due to the profile, which has a sharp nose. An additional problem is that the panels have to be skewed to keep the seam parallel to the longitudinal axis. That is why I then tried to pre-bend the panels, as with the aileron, with boiling water and then let them dry.
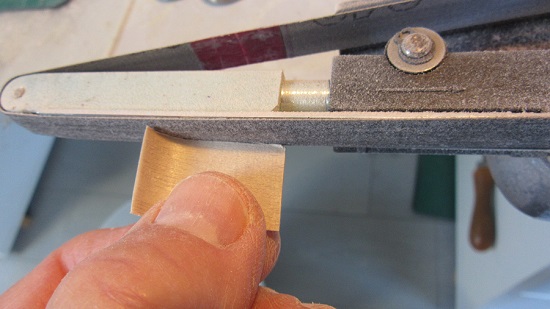
After that I made them fit and sanded a bevel on it.
In order not to get cramps in my fingers, I came up with an attachment, a thin aluminium profile, attached to the worktop with a G-clamp and covered with sandpaper as anti-slip.

. I smeared both surfaces to be glued with PVA
The glue has to be spread out still. After drying I put such a panel in its place, it can still slide and I heated it with a foil iron to set the glue This turned out to work fine, and the wings got a quick start

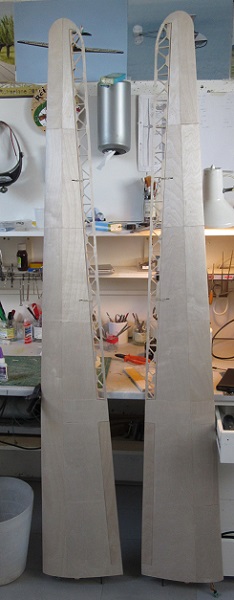
The bend in the gull wing also succeeded with two narrow panels.
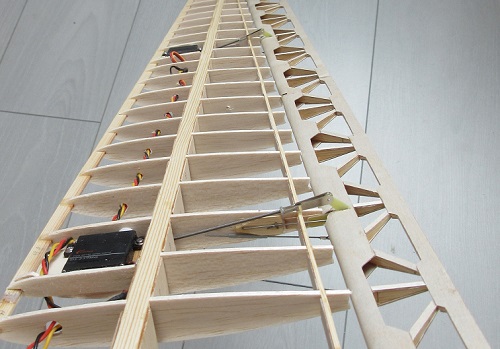
It begins to look like wings!
Vincent (DB) |
|
| Revenir en haut de page |
|
|
Johannes
Serial Posteur
Inscrit le: 23 Juil 2007
Localisation: Leichlingen
Âge: 64
|
| Posté le: 09/05/2021 21:00 Sujet du message: |
|
|
|
Boa 
100 Rippen 
Sieht beeindruckend aus Vincent
LG J
|
|
| Revenir en haut de page |
|
|
bocorvin
Maniaco Posteur
Inscrit le: 17 Aoû 2015
Localisation: Hillegom
Âge: 77
|
| Posté le: 09/05/2021 21:07 Sujet du message: |
|
|
|
Johannes,
Die rippen sind CNC aus balsa, wie sagt man dass auf Deutsch, die darf man nicht zahlen? keine handarbeit?
Aber es bleibt leicht, ein Flugel ist jetzt 750 gr, doch er wurdt vollig mit 0.6mm sperrholz bekleidet, hoffentlich komt er weniger als 1000gr aus.
LG
Vincent (DB) |
|
| Revenir en haut de page |
|
|
caralp_laurent
Psycho Posteur
Inscrit le: 30 Jan 2006
Localisation: La Houssaye en Brie 77
Âge: 51
|
| Posté le: 13/05/2021 13:55 Sujet du message: |
|
|
|
Congratulations Vincent, it's beautiful
Friendly,
Lolo
Lolométéo, rétro addict ;o)
"On commence à vieillir quand on remplace ses rêves par des regrets"
Sénèque |
|
| Revenir en haut de page |
|
|
bocorvin
Maniaco Posteur
Inscrit le: 17 Aoû 2015
Localisation: Hillegom
Âge: 77
|
| Posté le: 16/05/2021 20:35 Sujet du message: |
|
|
|
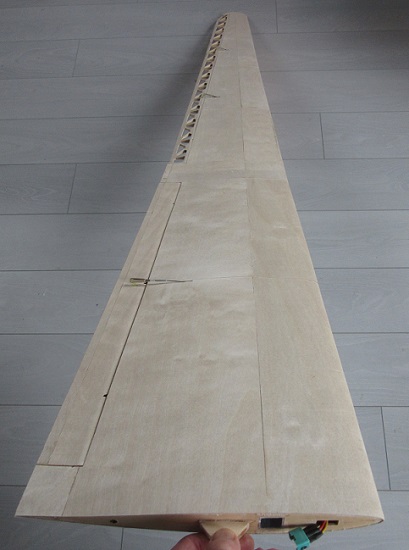
Merci beaucoup Lolo , in the meantime I went on,
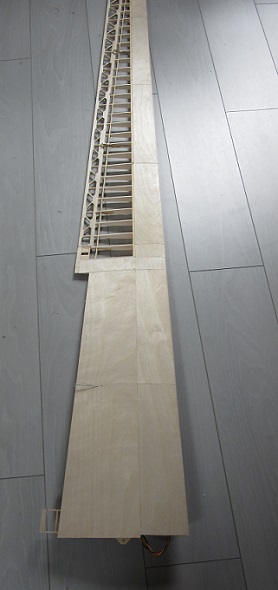
The wings are completely sheeted. Again a lot of panels, glued with the same technique, dried PVA and fixed with a foil iron
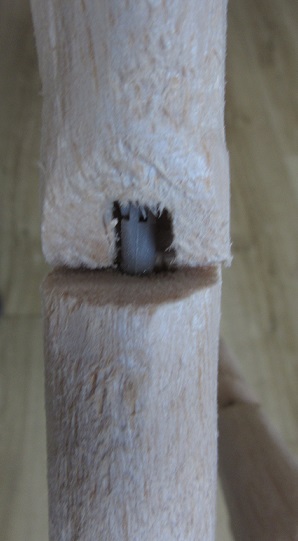
I have some doubts how that sticks to the balsa ribs, I think I should apply 2X PVA on them, now that the wing is still open , I can apply some extra glue, but when the top goes on, that will no longer be possible. As I got closer to the wingtip, I found that an extra pivot point for the aileron was needed. First drilled an oversized hole and then glued an epoxy bearing plate to the rib
With a long batten with sanding paper I sanded the edge of the sheeting straight
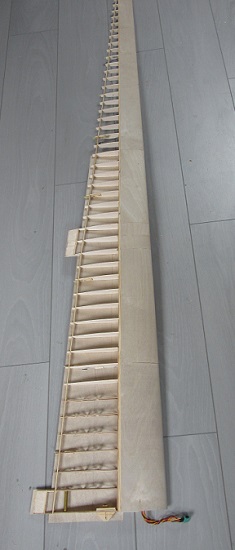
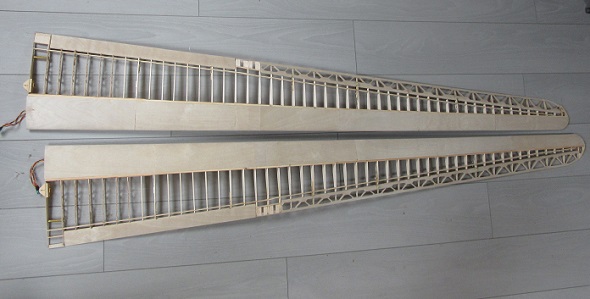
The sheeted wings look very strong
Vincent (DB) |
|
| Revenir en haut de page |
|
|
Sed
Maniaco Posteur
Inscrit le: 13 Mai 2015
Localisation: Villeurbanne
Âge: 57
|
| Posté le: 16/05/2021 21:50 Sujet du message: |
|
|
|
Hi Vincent,
Very nice job . I hadn't seen in the photos that the wing was completely sheeted. It will be very solid ![[grrr]](images/smiles/grrr.gif) ! !
Good continuation.
Serge |
|
| Revenir en haut de page |
|
|
bocorvin
Maniaco Posteur
Inscrit le: 17 Aoû 2015
Localisation: Hillegom
Âge: 77
|
| Posté le: 16/05/2021 22:52 Sujet du message: |
|
|
|
Hi Serge,
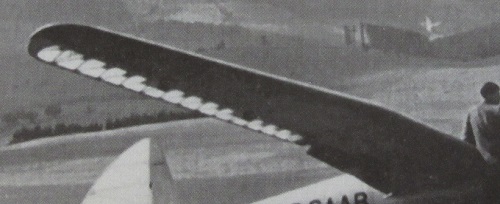
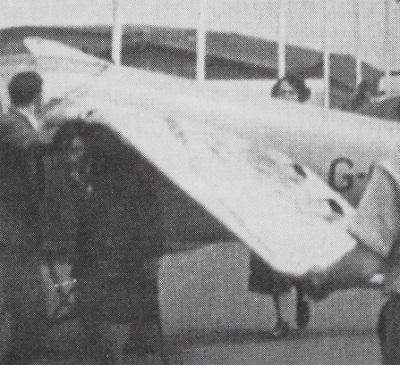
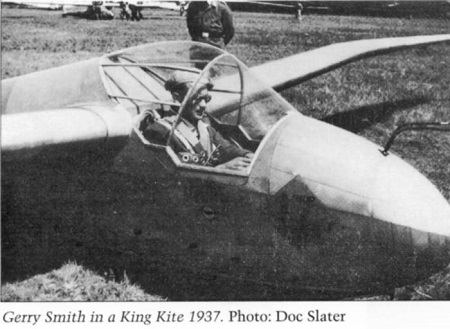
Yes, they were completely (except the ailerons) sheeted. It was a very modern glider for its time.
Through a mistake in the building jig (the real one ) they built 3! prototypes with wrong washout at the tips. These gliders where extremly difficult to get out of a spin and that was solved by a very large rudder. (not on my model)
Vincent (DB) |
|
| Revenir en haut de page |
|
|
Sed
Maniaco Posteur
Inscrit le: 13 Mai 2015
Localisation: Villeurbanne
Âge: 57
|
| Posté le: 16/05/2021 23:16 Sujet du message: |
|
|
|
Thank you Vincent for these detailed explanations !
Serge |
|
| Revenir en haut de page |
|
|
bocorvin
Maniaco Posteur
Inscrit le: 17 Aoû 2015
Localisation: Hillegom
Âge: 77
|
| Posté le: 22/05/2021 11:52 Sujet du message: |
|
|
|
Hello everyone,
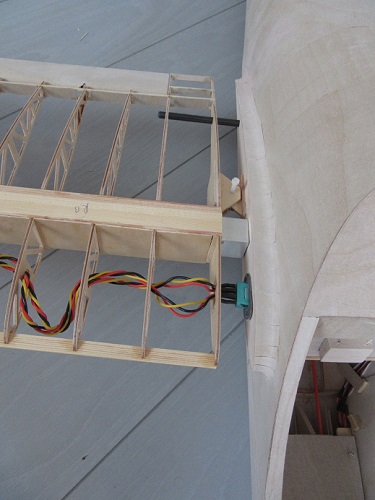
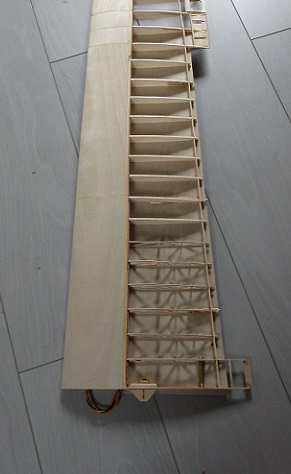
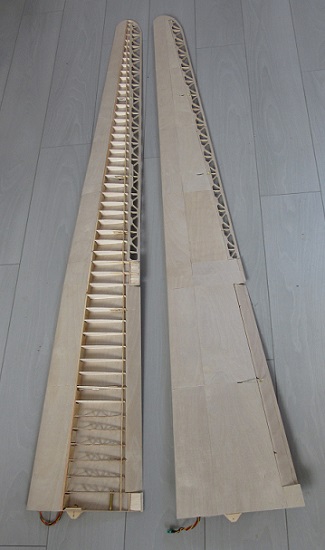
I now sheeted the topside of the wing, pre-priming the balsa ribs with PVA, that seems to work better.
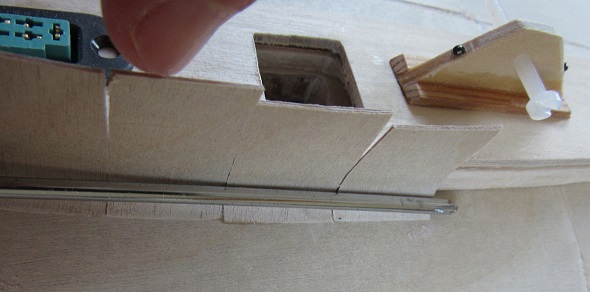
Next I had to trim the back of the sheeting for the ailerons and flaps. By the way, I had already done that with the bottom sheeting before applying the top sheeting. I did this by drilling a few 1mm pilot holes with the hinge pins as guidance and cutting the plywood along these holes. Of course there was still a lot of sanding. When the top of the wings were sheeted, I just repeated the process.
The ailerons and flaps remain demountable, just like that of the horizontal stabilizer
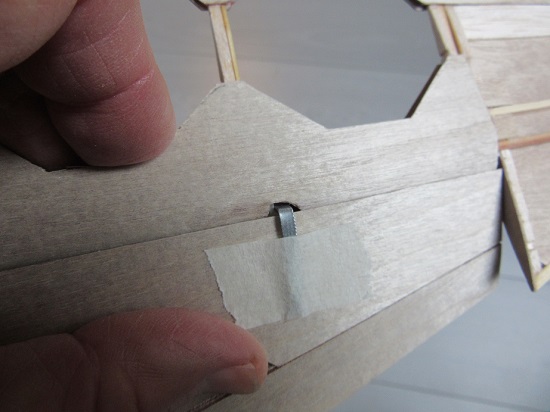
I plugged in the leads and to my relief it all worked.
The wings are now roughly finished weigh 936 and 942 grams.
Vincent (DB) |
|
| Revenir en haut de page |
|
|
Olli
Incurable Posteur
Inscrit le: 22 Juil 2006
Localisation: Germany
Âge: 56
|
|
| Revenir en haut de page |
|
|
bocorvin
Maniaco Posteur
Inscrit le: 17 Aoû 2015
Localisation: Hillegom
Âge: 77
|
| Posté le: 23/05/2021 18:11 Sujet du message: |
|
|
|
Hi Olli,
Danke , jetzt muss Ich die Pilotenpuppe machen, dann kann mein Schwester hoffentlich die Kleider machen.
LG,
Vincent(DB) |
|
| Revenir en haut de page |
|
|
Johannes
Serial Posteur
Inscrit le: 23 Juil 2007
Localisation: Leichlingen
Âge: 64
|
| Posté le: 23/05/2021 20:44 Sujet du message: |
|
|
|
Super Idee, Vincent
Ich werden auch mal meine Schwester fragen für die
Pilotenpuppe meines nächsten Modells die Garderobe zu schneidern.
Sie ist wohl auch nicht mehr taufrisch aber kann
ja mal was für ihren Burder machen 
LGJ
|
|
| Revenir en haut de page |
|
|
caralp_laurent
Psycho Posteur
Inscrit le: 30 Jan 2006
Localisation: La Houssaye en Brie 77
Âge: 51
|
| Posté le: 25/05/2021 21:26 Sujet du message: |
|
|
|
Friendly,
Lolo
Lolométéo, rétro addict ;o)
"On commence à vieillir quand on remplace ses rêves par des regrets"
Sénèque |
|
| Revenir en haut de page |
|
|
bocorvin
Maniaco Posteur
Inscrit le: 17 Aoû 2015
Localisation: Hillegom
Âge: 77
|
| Posté le: 24/06/2021 14:36 Sujet du message: |
|
|
|
Bonjour a tous,
Danke Johannes et merci Lolo for your comments, I go on.
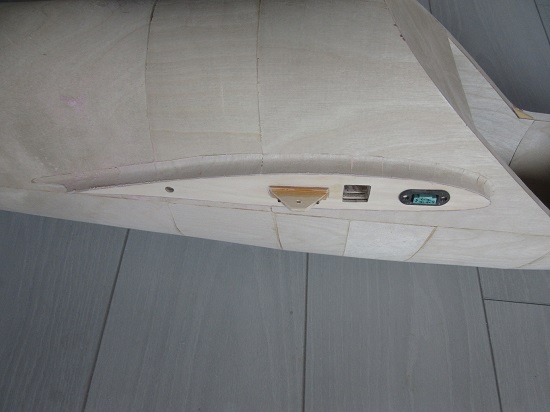
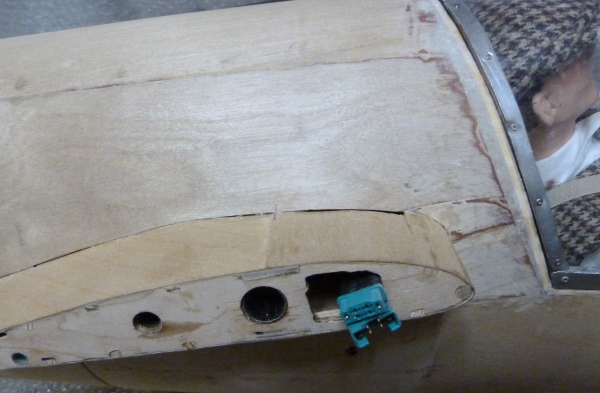
The connection of the wing to the fuselage is a bit different than I am used to. In the real glider there is a gap between fuselage and wing to get to the connecting gear.
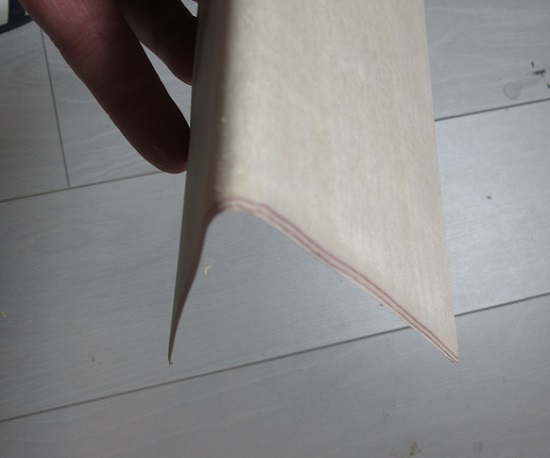
This gap is covered with a curved strip of plywood

I tried to replicate this. The wing of my model slides over the square glass epoxy wing connector and is secured with a nylon M3 bolt in plywood lips on the fuselage and wing.
.. I made a constructing aid consisting of 2 ribs (equivalent to the root rib). On this I clamped plywood with two rows of 3mm holes. On the inside I put first 2mm balsa and another strip of plywood
Holding the inner plywood in place with my fingers, I ran thin cyano through the holes on the balsa. I made a nose piece and also an upper and lower piece, up to the TE
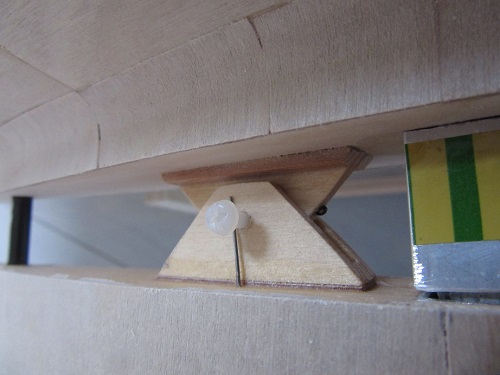
Then I glued the three pieces together, and cut it lengthwise forming the two filler pieces. I glued magnets to the rear to secure it
This piece now fits exactly in the gap and I glued 5mm wider strips on top, that fit just over the wing and fairing on the fuselage. You slide it over the wing
and click the magnets
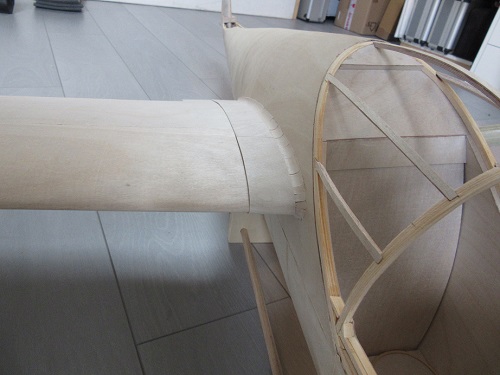
to my relief It suddenly formed a visual unit with the fuselage.
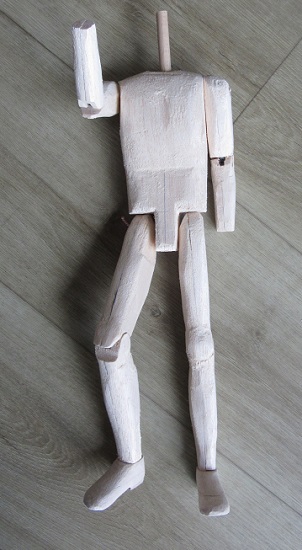
It was time for the interior, first the pilot.
The pilot is very visible, nice to make proper job of it. My sister wanted to make the clothes, but then I must have a figure first. I used my own measurements (a bit photoshopped....) and made the parts from 10mm balsa
. In the elbows and knees I fitted Hobart hinges,
the hips and shoulders I fixed with shockcord
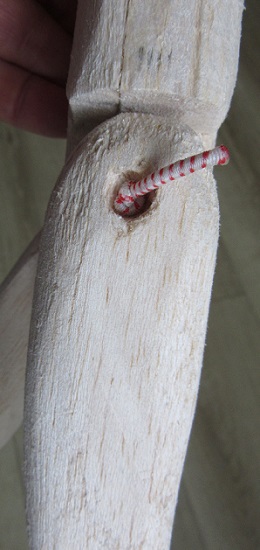
In this way you get a figure that can be positioned naturally.
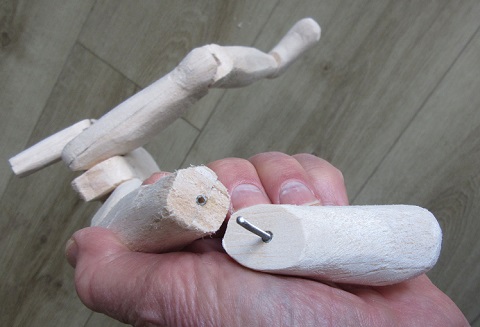
To attach the balsa boots I have glued a piece of M2 threaded rod in, which fits into a plastic tube (control tube stuff) in the lower leg. A small bend in the M2 wire provides some friction, just bend it carefully a little. The hands come with 1mm copper wire in the arms and the head with 10mm beech dowel in the chest. Hands, feet and head remain removable, much easier to get him into his clothes.
In the meantime I started with the head, made of sculpey. I learned a lot from next tutorial, it gives a wonderful explanation, but it is a time consuming job
https://www.youtube.com/watch?v=WlPYWe2bGUo
I start with beech dowel of 10mm, wrap aluminium foil around it (the head may not be solid, it might crack when baking) and then I build the head from layers sculpey
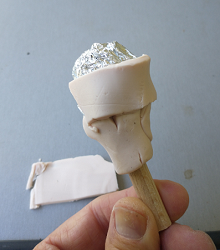
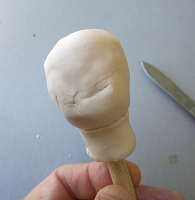
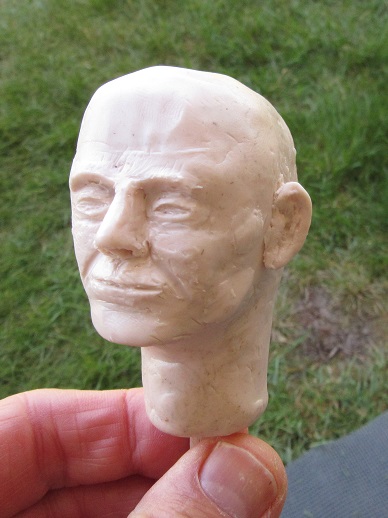
takes me a while, but it's nice work and it starts to look like something
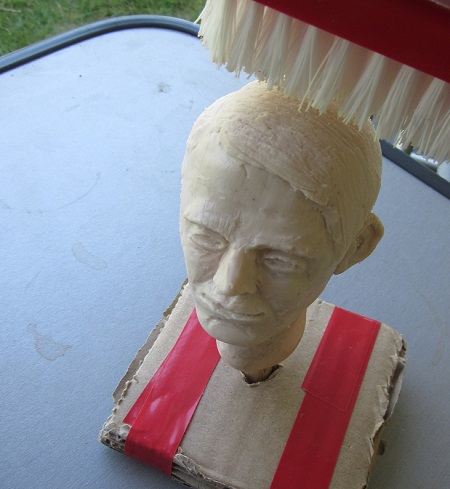
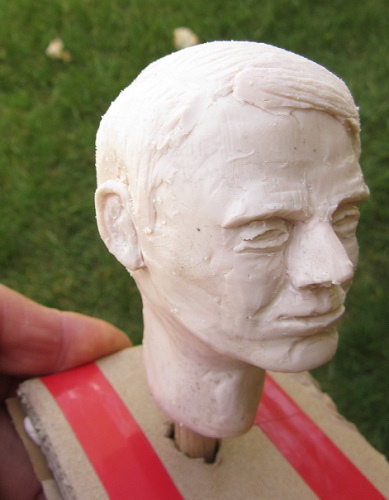
Its not yet finished.
Vincent (DB) |
|
| Revenir en haut de page |
|
|
|